
Key Takeaways:
Financial data extends beyond payment cards to include billing history, revenue, compensation, and sensitive details hidden within custom fields.
Protecting sensitive information requires a structured process covering discovery, risk classification, role-based visibility configuration, and sandbox testing.
Specialized masking solutions help streamline data discovery, bulk masking, and auditing to meet compliance standards like PCI DSS, SOX, and GDPR.
Most teams underestimate just how widely financial data lives across their Salesforce org. It starts in obvious places like payment fields and invoices. Then it shows up in notes, custom objects, and fields created by integrations that nobody thought to flag. By the time someone asks where it all lives, the honest answer is usually "we're not sure." That gap is one of the most common Salesforce data security problems.
That's why masking financial data in Salesforce works best as a clear process, not a one-time cleanup. This guide explains how to mask financial data in Salesforce, from finding the data to monitoring it afterward, and shows how a Salesforce data masking tool handles each stage along the way.
What Counts as Financial Data in Salesforce?
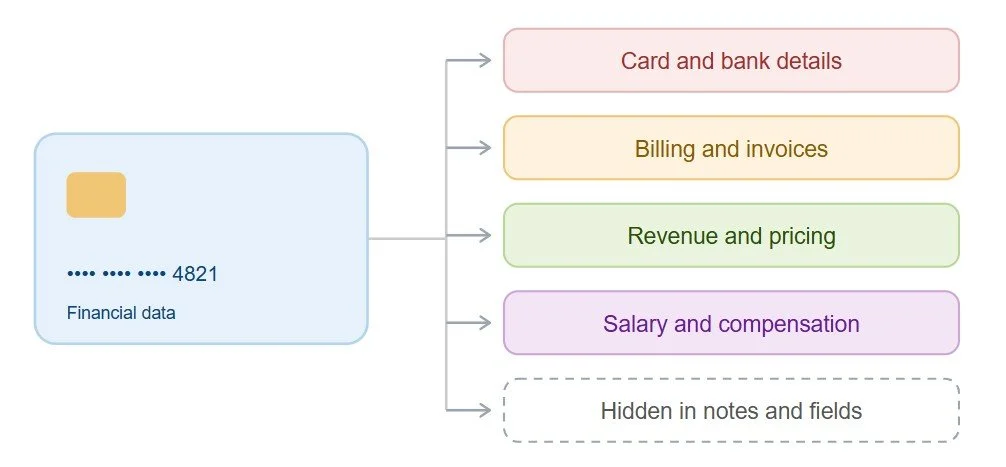
Before you can protect financial data, you need to know what it includes. In most Salesforce orgs, it covers more than payment cards.
Payment card and bank account details, including card numbers, account numbers, and routing information
Billing history, invoices, and payment records, which show what a customer has paid and when
Revenue figures, pricing, and discount structures, which are commercially sensitive even when they aren't personal
Salary and compensation data, often stored in employee or recruiting objects
The harder part is the data you don't expect. A support agent pastes card details into a case comment. An integration creates a custom field with bank information. A sales rep stores a negotiated discount in a free-text notes field. These fields rarely get flagged as sensitive, which is exactly why they cause problems later. Any financial data masking effort has to cover them too, or the gaps stay open.
Why Financial Data Needs Masking
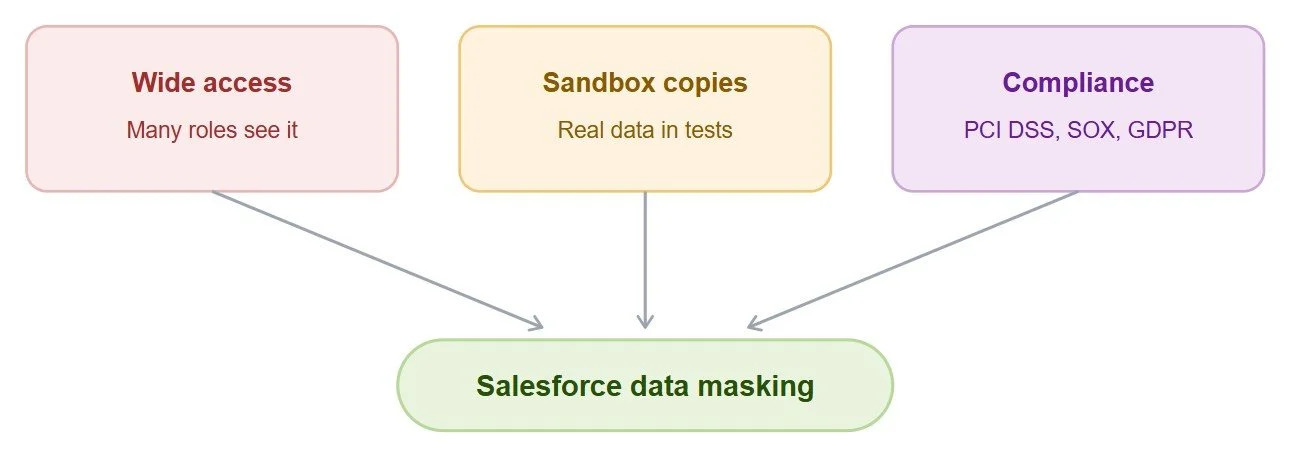
Financial data is visible to far more people than it should be. Sales reps, support agents, finance staff, contractors, and partners often share access to the same records. Most of them need only a small part of what they can see, and good Salesforce data protection starts by narrowing that gap.
Sandboxes add to the problem. A sandbox refresh typically copies real financial records into environments used by developers and testers. Those teams have no reason to see real card numbers or revenue details, but without masking, they can.
Compliance expectations raise the stakes further. Frameworks such as PCI DSS, SOX, and GDPR all expect organizations to limit exposure of sensitive financial information and to show proof that they've done it. That makes sensitive data protection a requirement, not a nice extra. A breach or audit finding costs far more than the effort of preventing one.
Salesforce data masking doesn't remove financial data from your org. It controls who sees the real value, so the people who need it keep it and everyone else doesn't.
Before You Start: What You Need in Place
A little preparation makes the steps below go much faster. Before you begin, pull together four things.
A list of teams and roles that touch financial data. This tells you who needs full, partial, or no visibility later on.
A clear view of which environments need Salesforce data masking. Decide whether you're protecting production, sandboxes, or both.
An owner for the process. Someone should be responsible for the setup and for keeping it current.
A rollback plan. Know how you'll reverse a change if something doesn't look right.
Step-by-Step: How to Mask Financial Data in Salesforce
Here is the full process of financial data masking and how a Salesforce data masking tool like Contour helps throughout the process, from finding the sensitive data to masking it.
Step 1: Scan your org to find financial fields
Start with discovery. A full org scan checks every object and field for sensitive data, while a targeted scan focuses on specific objects when you already know where to look.
With Contour, you can run a full Salesforce scan to find out every supported object automatically, a custom scan to focus on selected objects and fields, and a persona-based scan to see which sensitive data different user roles can access today.
Step 2: Review and classify what you found
Once the scan finishes, sort the results by risk. Card numbers and bank details come first, followed by billing records, then pricing and compensation data. Also separate fields that need full masking from those that only need partial masking. A card number might show only its last four digits, while a salary figure might be hidden entirely.
Step 3: Decide who should see what
Next, map roles to visibility levels. For each financial field, decide whether each role sees the full value, a partial value, or nothing. A common pattern looks like this.
Finance team: full values, since they need them to do their work
Support team: partial values, such as the last four digits of an account number
Contractors and partners: no access to real values at all
With one of the best Salesforce data masking tools like Contour, you get a persona-based scan that gives you a starting point by showing which sensitive fields each role can see right now. You can compare that against the visibility you want and spot the gaps.
Step 4: Choose the right masking pattern for each field
Different fields call for different patterns. Some work best with partial display, some with character replacement, and some with realistic substitute values. Keep the format valid wherever you can. A masked card number that still looks like a card number is far less likely to break a workflow, report, or validation rule.
With Contour, masking patterns are configured individually for each field, so you can match the pattern to the type of data instead of forcing one approach on everything.
Step 5: Configure rules in bulk
Masking one field at a time doesn't scale. If your org has dozens of financial fields across many objects, group them and apply shared settings together. Contour helps with bulk masking. That means you can apply masking configuration in bulk. You can select multiple fields from one object or select fields of a specific data type from different objects and then apply shared configuration at once.
Step 6: Apply masking across every layer
A field can appear on different page layouts, Lightning pages, and profiles with different permission sets. If you mask it in one place and leave it exposed in another, it isn't really protected. Coverage has to be complete.
With Contour, a single configuration controls visibility across page layouts, Lightning pages, profiles, and permission sets, so masked financial data stays masked wherever it appears.
Step 7: Test in a sandbox first
Before touching production, test your configuration in a sandbox. Log in as users from each role and confirm they see the right level of detail. Then check that reports, dashboards, and automations still work. A masked value that breaks a report is better caught here than in front of your finance team.
Now, the good news is you can safely mask your financial data directly in production with the help of Contour. Even if you mask a wrong field mistakenly, Contour helps you to reverse the masked field back to the original. However, it’s always best to test your masking configuration in a sandbox environment first.
Step 8: Deploy and verify
When the sandbox results look right, deploy to your target environment. Keep a record of exactly what changed. With Contour, real-time logs show deployment progress as it happens. Once it finishes, a deployment record is created automatically, and you can see how many pages, profiles, and permission sets were updated, along with field-level details.
Step 9: Roll back if something looks wrong
Even with careful testing, something may not look right after deployment. A good process lets you reverse a change quickly, adjust, and deploy again, without leaving fields in a half-finished state.
With Contour, rollback reverts everything applied during that deployment and restores the masked field to its earlier state. Every rollback creates its own record, and a rolled-back field becomes available to deploy again.
Step 10: Monitor and review regularly
Masking isn't finished after the first deployment. New fields appear, integrations change, and roles shift. Re-scan on a regular schedule and update your rules when access needs change.
For monitoring and tracking, Contour provides you with a dashboard and recent activity feed to show every scan, configuration, deployment, and rollback in one place. So, you can see the current state at a glance and answer compliance audit questions without any confusion. Learn more about passing a Salesforce security audit and compliance.
Common Mistakes to Avoid When Masking Financial Data
1. Masking only the obvious fields. Card numbers get attention, but financial details also hide in notes, descriptions, and integration fields.
2. Skipping the sandbox test. Problems with reports and automations are far easier to fix before deployment.
3. Masking one layer and assuming full coverage. A field hidden on a page layout can still appear through another route.
4. Treating it as a one-time project. Orgs change constantly, and a setup that was complete last year may not be complete today.
5. Not documenting changes. Without a record, proving protection to an auditor turns into guesswork.
Final Thoughts
Masking financial data in Salesforce comes down to a simple routine: find the data, classify it, decide who sees what, configure and apply the masking rules, test, deploy, and monitor. Each step is manageable on its own. The value comes from running them in order and repeating them over time.
A Salesforce data masking solution like Contour takes much of the manual effort out of that routine, from automated scanning to bulk configuration, deployment records, and rollback. The best place to begin is a single scan. It will show you where financial data currently sits in your org, and that's the starting point for stronger sensitive data protection across everything else.
Frequently Asked Questions
-
Start with the highest-risk data: payment card numbers, bank account details, and anything covered by PCI DSS. Then move on to billing records, pricing and discount data, and salary or compensation fields.
-
Yes, if masking preserves valid formats and you apply it by role. Teams that need real values for reporting, such as finance, keep full visibility, while other roles see masked values.
-
A well-built, platform-native masking approach applies rules through configuration rather than heavy custom code, so most orgs don't notice a meaningful slowdown.
-
Encryption protects data at rest or in transit, but authorized users still see the real value. Masking controls what each user sees, so the real value is hidden from anyone who doesn't need it.
-
Review them regularly, at least quarterly, and again after major changes such as new integrations, new fields, or changes in team roles.
Related Readings


Let's Talk

Drop us a note, we’re happy to take the conversation forward 👇🏻