
How to Integrate Salesforce Data Cloud with Service Cloud

Key takeaways:
A successful Salesforce Data Cloud integration starts with the right CRM connection, data streams, and identity resolution.
Service Cloud integration delivers a unified customer view, helping agents resolve cases faster and with greater context.
Salesforce Calculated Insights and Customer Segments transform unified data into actionable, AI-ready customer intelligence.
Imagine a customer emails support asking about a refund. The agent replies fast, closes the case, feels good about it.
But here's what the agent didn't know: that same customer had just received a marketing email promoting a product they had already returned last month. Now the customer thinks nobody at the company is talking to each other. And honestly, they're right.
This happens because Service Cloud and the rest of your customer data usually live in separate worlds. Cases sit in one place. Orders, browsing activity, and marketing touches fall elsewhere. Nobody connects the dots in real time.
A Salesforce Data Cloud integration with Service Cloud fixes exactly this. It brings everything about a customer, their cases, orders, and past interactions into one clean profile. That profile then shows up right where the agent is working, whether it's a human rep or an Agentforce service agent handling the case. Let's walk through how to set it up, step by step.
Checklist Before Integrating Salesforce Data Cloud with Service Cloud
Before you touch a single setting, get these in order. Skipping this list is the #1 reason integrations stall halfway through.
Data Cloud license provisioned on your Salesforce org (Data 360, in current licensing terms).
System Administrator or Data Cloud Admin permission set assigned to whoever is running the setup.
Service Cloud org already live with Cases, Contacts, Accounts, and (if used) Omni-Channel configured.
Clean, de-duplicated source data: Data Cloud will harmonize what you give it, but it won't fix bad data entry on its own.
A clear list of use cases: case deflection, unified profile view, next-best-action, or agent-facing summaries. Knowing the "why" shapes every mapping decision later.
Storage and consumption budget check: Data Cloud pricing is consumption-based, so it's worth estimating record volume up front with your admin or your Salesforce integration service partner.
Once these boxes are ticked, you're ready to start building.
Step 1: Connect Your Salesforce CRM Org to Data Cloud
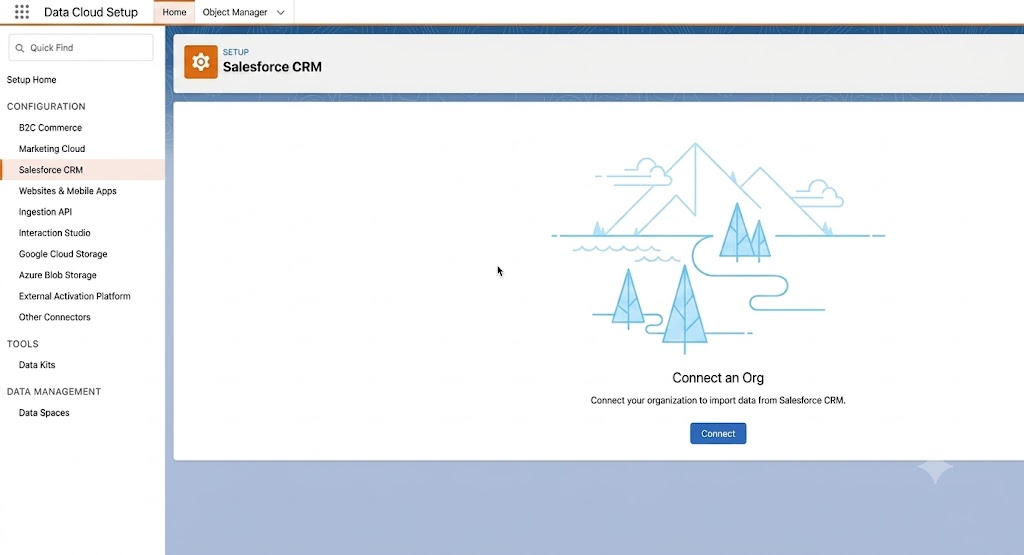
Start by establishing a connection between your CRM org and Data Cloud.
1. From Setup, search for Data Cloud Setup and open it.
2. Under Salesforce CRM, click New to create a connection.
3. Choose whether you're connecting to the same org where Data Cloud is provisioned or an external org.
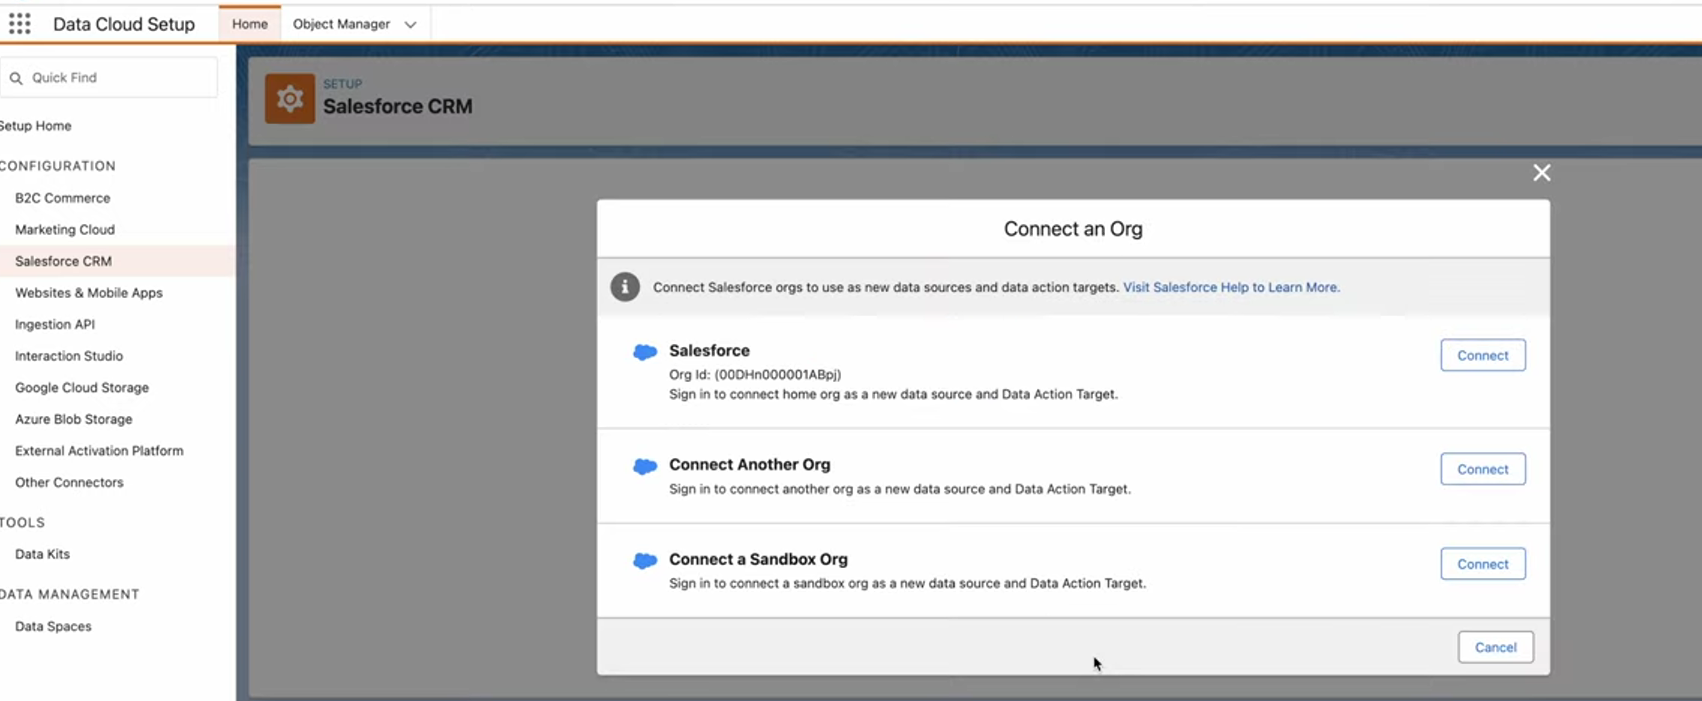
4. Authenticate with admin credentials and confirm the connection.
5. Once connected, Salesforce auto-generates a Data Cloud Salesforce Connector permission set; this governs which objects and fields flow into Data Cloud.
Once connected, Salesforce CRM data such as Cases, Contacts, and Accounts can be ingested into Data 360 through CRM data streams. Depending on your data stream configuration, updates can be processed in scheduled batches or streaming mode.
Step 2: Install the Service Cloud Standard Data Bundle
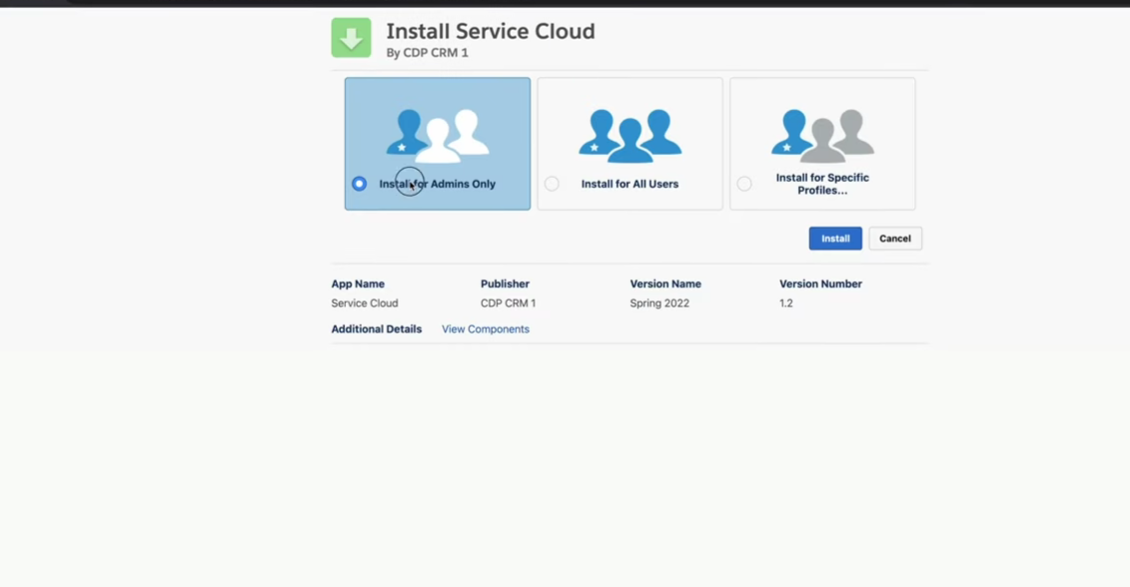
Rather than mapping every Case, Contact, and Account field manually, Salesforce ships a pre-built Service Cloud Data Bundle (built on Data Kits) that handles the heavy lifting.
In Data Cloud Setup, go to Data Bundles.
Find Service Cloud under Standard Data Bundles and click the dropdown arrow, then Install.
Choose Install for Admins Only in the data kit install window (you can widen access later).
Click View Components before finalizing; this shows exactly which objects, fields, and data streams the bundle will create. Older or lighter bundle versions may only bring in core objects like Account, Contact, and Case; newer versions add more, including Field Service objects, so pick the version that actually matches your org rather than installing everything by default.
Click Install, then Done once it completes.
This single step usually saves days of manual configuration, since the bundle auto-creates the data streams, default mappings, and relationships needed for the most common Service Cloud objects.
Step 3: Create and Deploy a Service Cloud Data Stream
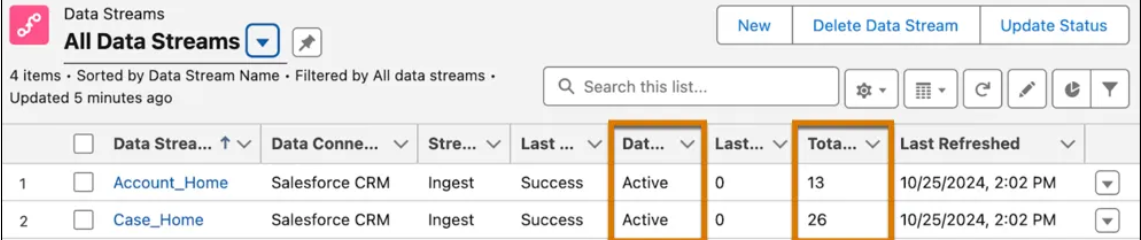
If the standard bundle doesn't cover something you need, such as a custom object, a specific case field, or survey data, you'll create a data stream manually.
In Data Cloud, go to Data Streams and click New.
Select Salesforce CRM as the source and pick your connected org.
Choose the object (Case, Contact, Account, or a custom object) you want to bring in.
Configure the refresh frequency as near-real-time or scheduled, depending on how time-sensitive the use case is.
Deploy the stream. Salesforce ingests records into Data Lake Objects (DLOs), which are then mapped to the appropriate Data Model Objects (DMOs).
A quick tip here: if you're also enabling Omni-Channel routing or survey-based case data, make sure those features are switched on in Service Cloud settings first; Data Cloud can only stream what Service Cloud is actually generating.
Step 4: Configure Data Mapping and Identity Resolution
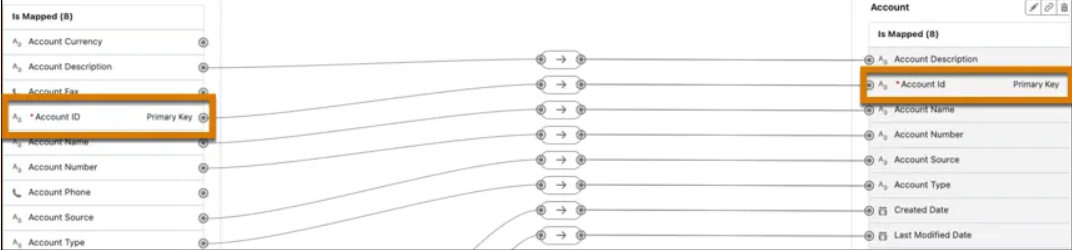
This is where the real magic and the real risk of a messy build happens.
Open the data stream and review the default field mappings the bundle created. Adjust anything that doesn't match your org's custom fields or business logic.
Go to Identity Resolution and define (or reuse) a ruleset that tells Data Cloud how to recognize "this is the same person" across systems, matching on email, phone, or a custom match key.
Set match and reconciliation rules: which source wins when two records disagree on the same field (e.g., most recent update, or a designated system of record).
Run the resolution and review the resulting Unified Individual and Unified Profile records.
Done well, this step is what produces real-time profile harmonization: a single, continuously updating view of the customer instead of five conflicting versions spread across Case, Contact, and any connected external system.
Step 5: Create Calculated Insights and Customer Segments

Raw unified data is useful, but insights are what actually change how an agent handles a call.
Go to Calculated Insights in Data Cloud and click New.
Use the built-in SQL-like builder (or a template) to define metrics: total case count in the last 90 days, average resolution time, churn risk score, lifetime value.
Schedule how often the insight recalculates.
Separately, build Segments in Data Cloud to group customer accounts, at-risk renewals, high case-volume contacts using the unified profile and calculated insight fields.
These become the backbone of smarter service: instead of an agent guessing whether a customer is a priority account, the insight is already sitting on the record.
Step 6: Surface Unified Customer Data in Service Cloud
None of this matters if it stays trapped inside Data Cloud. The goal is to get it in front of the person or the agent actually working the case.
Configure the Lightning Record Page for the Case or Contact object to surface Data Cloud profiles, Calculated Insights, Profile Explorer, or other supported Data Cloud components. This allows service agents to access unified customer information without leaving Service Cloud.
For Agentforce service agent setups, connect the relevant Data Model Objects and Calculated Insights as grounding data so the AI agent can reference accurate, up-to-date customer context when responding. This is often referred to as Service Cloud grounding, since it keeps the agent's answers tied to real account facts rather than generic assumptions.
Where relevant, wire insights into flows or Next Best Action strategies so recommendations appear automatically during case handling.
This is also where the idea of an agentic context layer comes in. Data Cloud isn't just feeding dashboards anymore; it's feeding the reasoning layer that both human agents and AI agents draw from mid-conversation.
Step 7: Validate and Test the Integration
Don't skip this step just because everything looks like it deployed cleanly.
Create or edit a test Case and confirm the Data Cloud component populates with accurate, current information.
Check that Identity Resolution is correctly merging profiles; search for a known customer across systems and confirm you get one unified record, not duplicates.
Verify Calculated Insights are updating on schedule and are not showing stale numbers.
If Agentforce is in play, run a few sample conversations and confirm the agent's responses actually reflect the grounded data, not hallucinated details.
Load-test with a realistic data volume before rolling out org-wide; a handful of test records rarely exposes mapping issues that show up at scale.
Common Integration Challenges and Best Practices
A few patterns show up again and again in real implementations:
Permission errors during data streaming. Usually traced back to the Data Cloud Salesforce Connector permission set missing object- or field-level access. Check Setup > Permission Sets before assuming it's a bigger issue.
Duplicate profiles after Identity Resolution. Almost always a matching rule that's too loose or too strict. Start conservative, then loosen match rules gradually while monitoring merge results.
Stale Calculated Insights. Confirm the refresh schedule actually matches your use case; a nightly refresh won't cut it for a live agent-facing insight.
Bundle version mismatches. Installing the latest Service Cloud bundle version without checking components first can bring in objects (like Field Service) your org doesn't use, adding clutter and cost. Always review components before installing.
Underestimating consumption costs. Since Data Cloud pricing scales with data volume and processing, it's worth monitoring usage in the first few weeks rather than assuming your initial estimate was right.
Treating this as a one-time project. Customer data changes constantly: new case types, new products, new segments. Revisit mappings and insights quarterly, not just at go-live.
Wrapping Up
Integrating Salesforce Data Cloud with Service Cloud helps unify customer data, giving service teams the context they need to resolve cases faster and deliver more personalized support. By following the right implementation sequence from connecting your CRM org to validating the integration, you can build a reliable foundation for both human agents and AI-powered experiences.
If your organization needs help with a complex implementation, an experienced Salesforce Consultant can simplify the process and help avoid common configuration and data mapping challenges.
Frequently Asked Questions
-
Salesforce Data Cloud integration with Service Cloud creates a unified customer profile by combining CRM and external data sources. This gives service agents complete customer context, helping them resolve cases faster and deliver more personalized support.
-
Yes. A Salesforce CRM connection is the first step in the integration process. It allows Data Cloud to securely access Service Cloud data and ingest it through CRM data streams.
-
The Service Cloud Standard Data Bundle includes preconfigured mappings, data streams, and relationships for standard Service Cloud objects such as Cases, Contacts, and Accounts. It helps reduce manual configuration during implementation.
-
Identity Resolution matches customer records from multiple sources using identifiers like email, phone number, or customer ID. It creates a unified customer profile that can be used across Service Cloud and other Salesforce applications.
-
Yes. If the standard Service Cloud Data Bundle doesn't include your custom objects or fields, you can create custom Salesforce Data Streams and configure the required data mappings manually.
Related Reading

Let’s Talk

Drop us a note, we’re happy to take the conversation forward 👇🏻