
Building Agent Tools for Breeze AI: Extending HubSpot’s Autonomous Agents
Key Takeaways:
Agent Tools connect Breeze AI Agents to your own app's data and actions, extending what they can do beyond HubSpot's built-in capabilities.
The key step is adding the AGENTS client with a toolType and a clear
actionDescription, since that's what tells Breeze the tool exists and when to use it.Agent Tools are still in beta, so test carefully with real prompts and keep your field names precise before deploying.
On April 14, 2026, HubSpot’s Spring Spotlight was big for Agent Tools, with an expanded set of Custom Workflow Actions that AI agents can now call on to get things done for users. Built on HubSpot's Developer Projects framework, these tools give Breeze AI Agents access to your app's capabilities too, not just what HubSpot offers out of the box.
So how do you actually go about building an Agent Tool for Breeze AI? And once it's built, what happens when an agent puts it to use?
In this article, we’ll explore what Agent Tools are, go through how to build one, and how Breeze AI Agents turn a request into an actual action.
Understanding Breeze AI: The Groundwork for HubSpot's Autonomous Agents
HubSpot's AI tools all live under one roof: a suite called Breeze, and it breaks down into three main pieces: Breeze Copilot, Breeze Agents, and Breeze Intelligence.
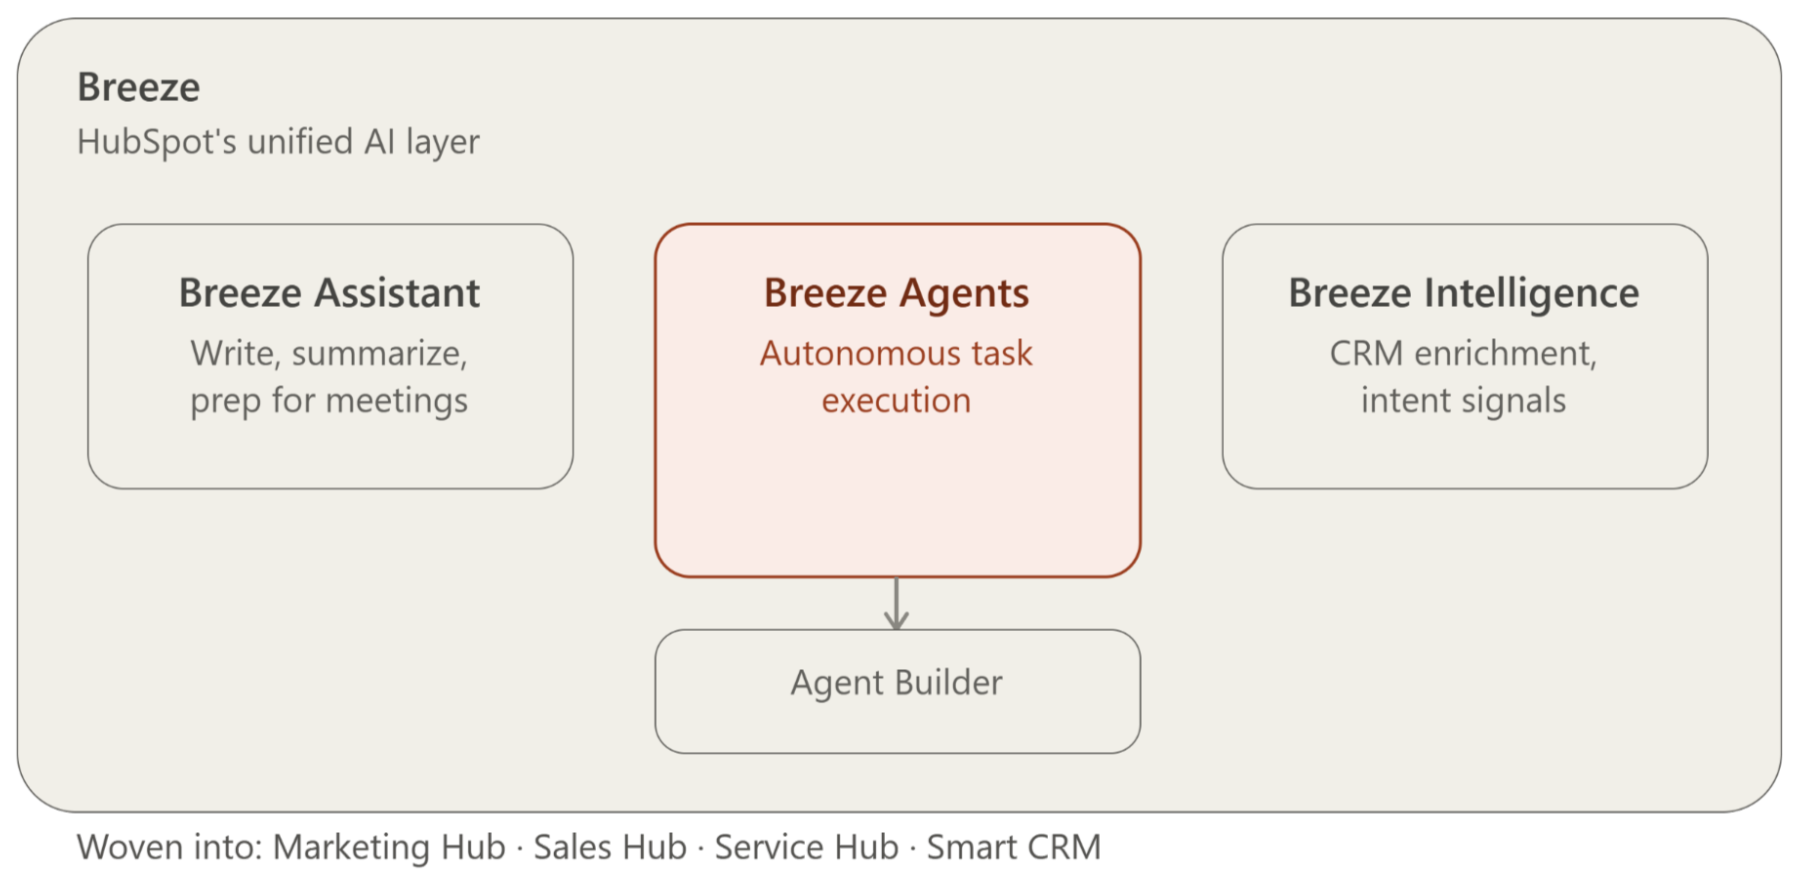
Breeze isn't some separate app you bolt on. It's HubSpot's unified AI layer, woven right into Marketing Hub, Sales Hub, Service Hub, and the Smart CRM.
Each piece handles its own kind of work:
Breeze Assistant: An embedded AI assistant that helps you write, summarize, prep for meetings, and take action without ever leaving HubSpot.
Breeze Agents: Specialized tools that get work done autonomously. Each one's built for a specific job: content, prospecting, customer support, or data management.
Need to build or customize an agent? HubSpot’s Agent Builder (formerly Breeze Studio) gives teams a dedicated space to configure agents with the instructions, knowledge, and actions they need.
Breeze Intelligence: The data layer underneath it all. It enriches your CRM records using a network of 200M+ buyer and company profiles, surfaces buyer intent signals, and even auto-shortens forms for visitors who've already filled one out before.
How to Build an Agent Tool for Breeze AI: 6 Steps to Get It Working
Building a HubSpot Agent Tool involves a few straightforward steps, from setting up your developer project to testing the tool and making it ready for your Breeze Agent.
Step 1: Create a HubSpot Developer Project
Before building the Agent Tool, you need a HubSpot developer project.
Install the latest HubSpot CLI on your computer.
Open your terminal.
Run:
4. Authenticate your HubSpot developer test account with:
5. Create a new project by running:
6. When HubSpot asks you to choose a template, select a boilerplate project type. The platform version is set automatically for these.
7. Open the project folder after it has been created.
Your project's hsproject.json must have platformVersion set to 2025.2 or 2026.03. This is required for Agent Tools and is applied automatically on boilerplate projects.
Step 2: Add the Agent Tool to Your Project
Open your project folder.
Go to src/app/.
Create a new folder called workflow-actions.
Inside that folder, create a new JSON file.
Give the file a name ending in -hsmeta.json.
This file contains the configuration that tells HubSpot how your Agent Tool works.
Step 3: Configure What the Tool Does
Open your -hsmeta.json file and define the tool's basic configuration:
uid — internal unique identifier for the tool
type — set to workflow-action
actionUrl — the public, publicly accessible HTTPS endpoint your tool will call (it cannot be a serverless function inside the project). This is the connection point for most HubSpot integrations with external systems
inputFields — data sent to your endpoint
outputFields — data returned by your tool, structured as string-string key/value pairs
labels — names and descriptions shown in the agent UI (must include at least an en locale, with actionName and appDisplayName required)
HubSpot sends a POST request to actionUrl when the tool runs.
Step 4: Tell Breeze That This Is an Agent Tool
Inside supportedClients, add the AGENTS client along with toolType and llmConfig:
toolType tells Breeze what kind of capability the tool provides:
GET_DATA — retrieves information from HubSpot or external sources
GENERATE — generates content, summaries, analyses, or suggestions
TAKE_ACTION — performs an action (e.g., CRM updates or actions in external systems). By default, this requires user review before execution — configurable later in the Agent editor.
llmConfig.actionDescription is critical: it's the only thing the agent sees to decide when and how to call your tool. It's never shown to end users.
Step 5: Upload and Test the Tool (Two Phases)
Phase 1: Workflow testing:
Save the JSON file and run hs project upload.
Create a test workflow in HubSpot and add your Agent Tool as a workflow action.
Test with both correct and incorrect inputs.
Verify expected outputs and error handling.
Phase 2: Agent integration testing (using the Developer Tool Testing Agent from the Agent Marketplace)
Install and configure the Developer Tool Testing Agent.
Add your tool under "What this agent can access."
Test tool recognition (does the agent know when to use it?), parameter extraction (direct vs. indirect prompts), and sequential operations (does it chain correctly with other tools?).
Step 6: Refine and Deploy
If testing doesn't go well, don't deploy yet. Go back and refine:
llmConfig.actionDescription
Tool name and labels
Input field names and descriptions
Output field definitions
For example, instead of a vague field like "Date," use something explicit like "Event start date (YYYY-MM-DD)." LLMs need more precision than human users typically do.
Once the tool performs reliably, it's ready for deployment. If you're publishing it via the HubSpot Marketplace, additional app review requirements apply.
How Do Agent Tools Work? From Agent Request to Action
Once your tool is live, it doesn't just sit there waiting to be manually triggered. HubSpot Breeze Agents call it on their own, in real time, whenever a user's request matches what the tool is built to do.
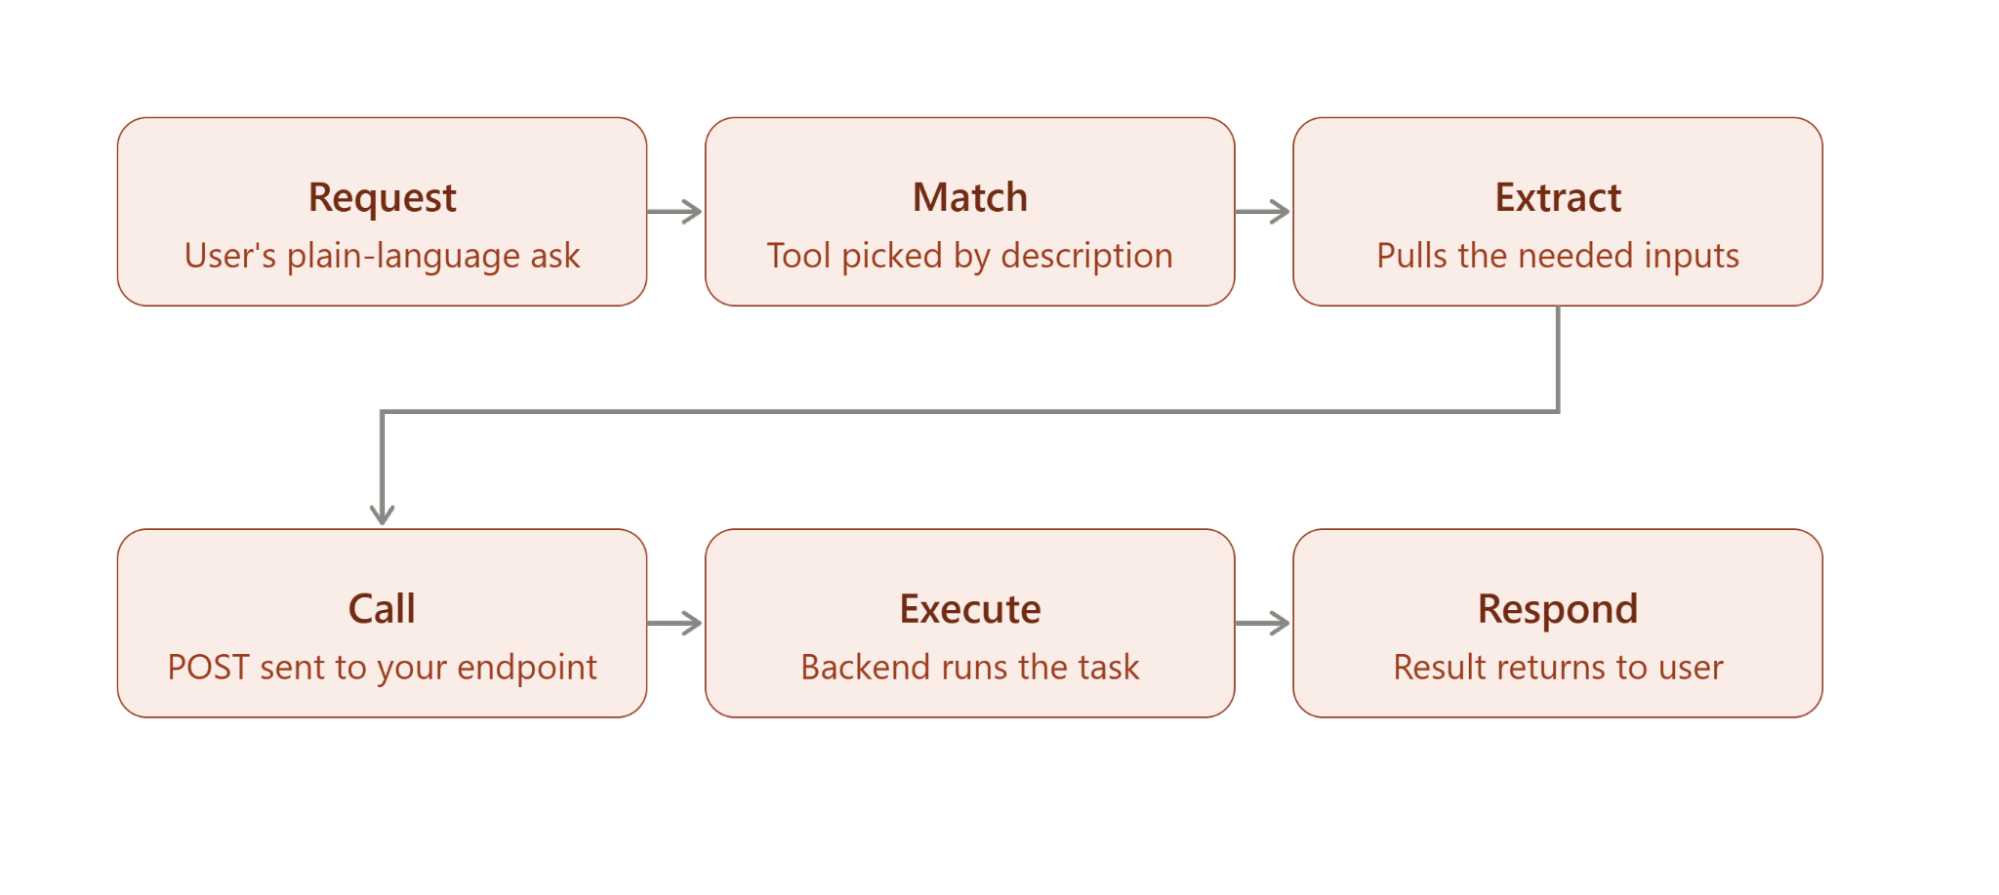
There's no extra setup needed on the user's end; they just type a request in plain language, and everything else happens behind the scenes. Here's what that process actually looks like:
| Aspect | Initial Security Review | Continuous Compliance |
|---|---|---|
| Purpose | Validate app before launch | Maintain security after release |
| Timing | One-time (pre-launch) | Ongoing (post-launch lifecycle) |
| Focus | Baseline security requirements | Evolving threats & updates |
| Scope | Static application state | Code, dependencies, AI, integrations |
| Outcome | Approval to publish | Long-term risk reduction |
| Responsibility | Development team | Cross-functional teams (Dev, Security, Ops) |
To the user, it just looks like a quick reply from Breeze AI. But in that split second, your HubSpot Agent Tool has already been matched, fed the right details, and called into action to complete the request behind the scenes.
Tips for Building Better Agent Tools for Breeze AI
Getting an Agent Tool to run is one thing. Getting Breeze to actually understand it and use it well is a different challenge. Here's what to keep in mind as you build yours.
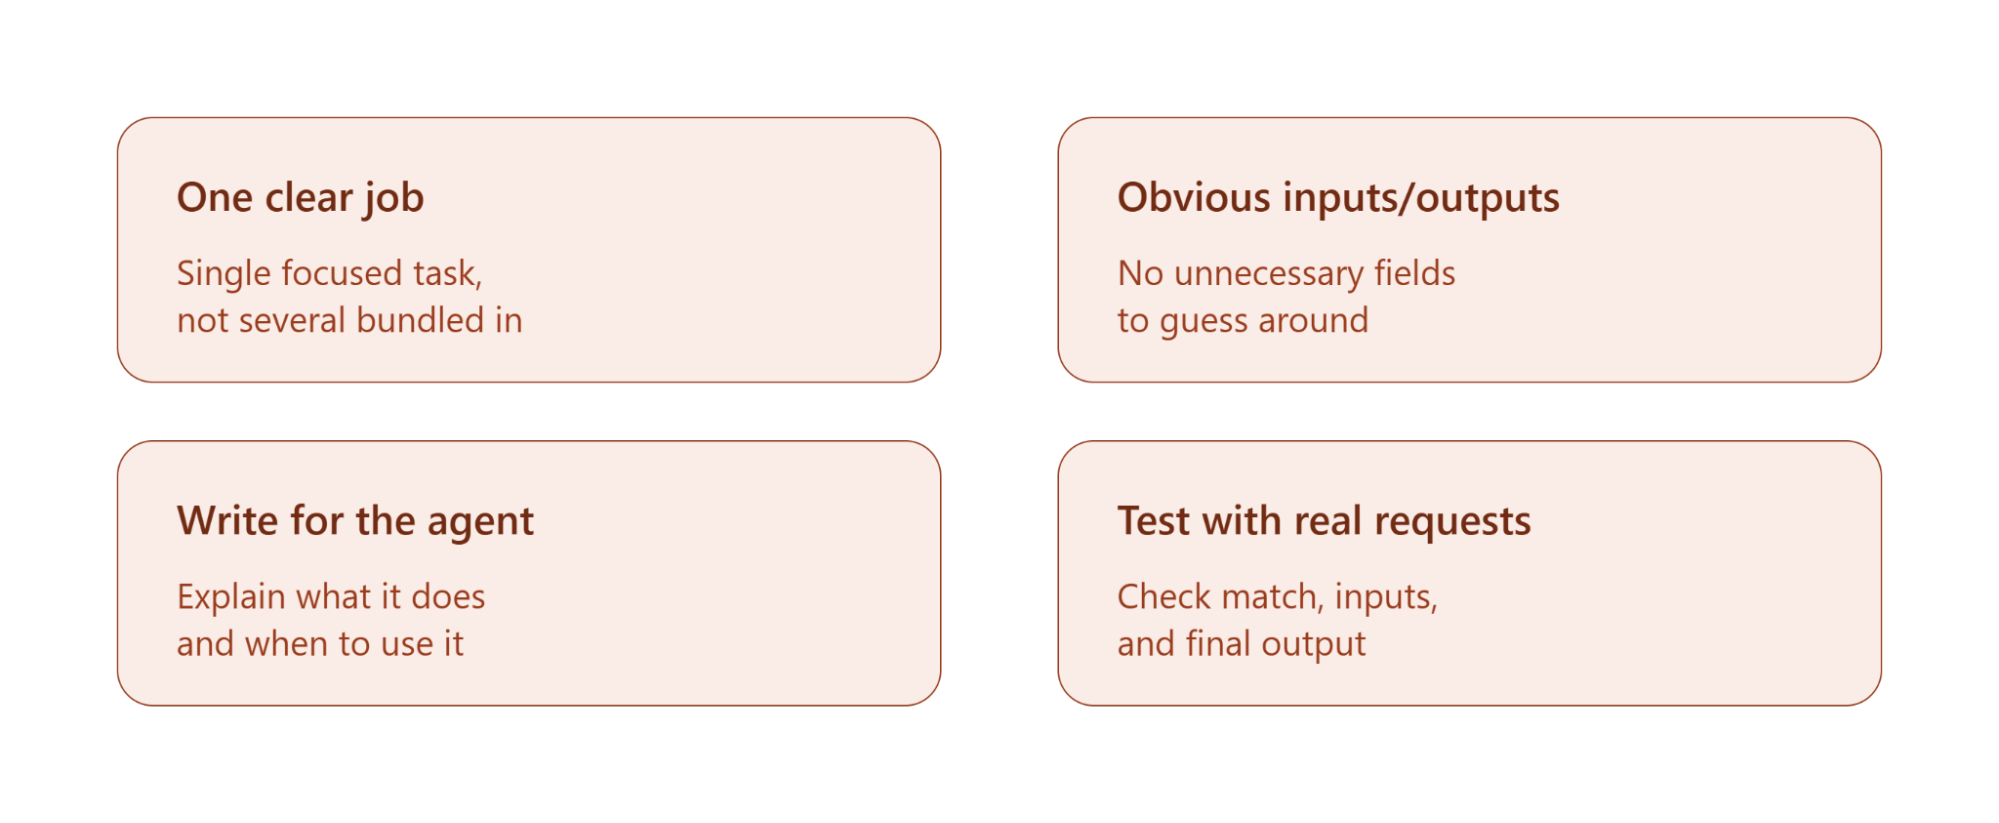
Give the tool one clear job: Resist the urge to make it do everything. A tool built around one specific task is just easier for an agent to reason about and easier for it to get right.
Make inputs and outputs obvious: Be deliberate about what the tool needs to receive and what it hands back. Extra inputs or outputs that aren't really necessary just add noise and make the tool harder to use correctly.
Write the description like you're explaining it to someone new: Say what the tool does and, just as importantly, when the agent should reach for it. This is the main thing Breeze relies on to decide whether your tool is the right fit for a request, so don't skimp on it.
Test with real, messy requests: Don't stop at "does the action run." Try the kind of prompts a real user would actually type, and watch whether Breeze picks the right tool, pulls the correct inputs, and does something sensible with what comes back.
At the end of the day, the goal is simple: a tool whose purpose, inputs, and results are clear enough that both you and the Breeze Agent using it never have to guess.
Conclusion
Agent Tools are what let Breeze AI Agents step outside their default limits. Connect the right custom actions and app capabilities, and suddenly your agent isn't just answering questions; it's actually getting things done.
So here's the real question worth sitting with: what could your Breeze Agent do if it had the right tools in its hands?
If that idea sounds promising but a little daunting to build on your own, that's exactly where HubSpot Consulting and a HubSpot integration service come in, turning the concept into something that actually works, end to end.
Frequently Asked Questions
-
An Agent Tool can retrieve information, generate content or results, or perform actions. HubSpot provides three main tool types: GET_DATA, GENERATE, and TAKE_ACTION.
-
An Agent Tool is a capability that allows a Breeze AI Agent to perform a specific task, such as retrieving data, generating information, or taking an action in HubSpot or an external system.
-
Breeze Assistant helps users with everyday tasks like answering questions and creating content. Breeze Agents are built to perform specific tasks more autonomously using instructions, knowledge, and tools.
-
Breeze Assistant is a good starting point because it helps teams handle everyday tasks without a complex setup. Once you're comfortable using it, you can explore Breeze Agents and custom Agent Tools for more advanced automation.
-
Breeze Studio was HubSpot's original no-code builder for configuring and creating AI agents. As of July 2026, HubSpot renamed it to Agent Builder as part of a broader move that relocated Breeze Agents into a new home called Agent Hub.
-
Not directly. Agent Tools are still built the same way through a HubSpot developer project and a -hsmeta.json file with the AGENTS client. The rename affects where you configure and manage agents in the UI, not how developers build the tools those agents call.
-
Partially. Standard enrichment features are included at no extra cost on Core seats. Anything beyond that heavier lookups, buyer-intent monitoring, or custom Smart Property enrichment consumes HubSpot Credits, which are shared across other Breeze features too, so heavy usage in one area can reduce what's available elsewhere.
Related Readings


Let’s Talk

Drop us a note, we’re happy to take the conversation forward 👇🏻