

How to Set Up Agentforce Lead Nurturing in Marketing Cloud to Automate Lead Qualification
Key Summary:
Agentforce Lead Nurturing automates lead qualification, outreach, and follow-ups in Salesforce Marketing Cloud.
AI-powered workflows in Agentforce engage and qualify leads 24/7.
Proper Agentforce setup and Salesforce services help improve conversions and streamline lead nurturing.
Even in the hyper-competitive landscape of 2026, lead qualification remains a critical bottleneck for many Salesforce Marketing Cloud users. While sales teams burn hours chasing low-value prospects, high-intent leads are left waiting, ultimately stalling revenue.
Agentforce Lead Nurturing (formerly known as Agentforce SDR) eliminates this friction. By deploying autonomous AI to qualify, engage, and seamlessly hand off only sales-ready leads 24/7, organizations are fundamentally redefining their outreach.
This guide breaks down everything you need for the successful setup of Agentforce lead nurturing in Salesforce Marketing Cloud, including setup steps, core features, and common pitfalls affecting conversions.
What Is Agentforce Lead Nurturing?

Agentforce Lead Nurturing (Agentforce SDR) is an autonomous AI agent built on the Salesforce trusted AI platform that helps businesses scale top-of-funnel efforts, streamline prospect qualification, and improve sales automation around the clock.It automatically engages new or updated leads, contacts, and person accounts by sending personalized outreach emails, responding to prospect replies, and connecting qualified leads with sales representatives.
Key Features
Personalized Outreach: Crafts and sends customized emails using lead data, with automated follow-ups.
Intelligent Responses: Answers questions using company data and handles opt-outs or off-topic replies.
Seamless Handoffs: Detects buying intent to book meetings and transfers leads with full context to sales representatives.
24/7 Operation: Integrates with Sales Engagement cadences and tools like Einstein AI.
Guardrails: Uses workflows and dashboards for safe performance.
Step-by-Step Guide to Set Up Agentforce Lead Nurturing in Marketing Cloud
Agentforce Lead Nurturing helps organizations automate lead engagement, qualification, and follow-ups using AI-powered workflows and intelligent sales automation. Through Salesforce Go and Agentforce Studio, businesses can build autonomous AI agents that engage prospects, send personalized outreach, and route sales-ready leads to sales teams automatically.
Follow the steps below to successfully configure and activate Salesforce Agentforce Lead Nurturing in Salesforce.
Step 1: Complete the Prerequisites
Before setting up AI-powered Lead Nurturing, ensure your Salesforce environment is properly configured to support intelligent lead engagement and automation workflows. Preparing these prerequisites in advance helps streamline implementation and avoid configuration issues later in the process.
Before proceeding, verify that:
Agentforce is supported and enabled in your Salesforce environment
Salesforce Go and Marketing Cloud integrations are properly configured using reliable Salesforce integration services
Einstein Activity Capture and Salesforce Inbox are enabled
Required user permissions and admin access are assigned
A business email account and calendar are ready for connection
Lead, contact, and account data are properly organized in Salesforce
Data 360 or relevant knowledge sources are available for AI grounding
Once these requirements are in place, you can begin configuring Agentforce Lead Nurturing inside Salesforce Go.
Step 2: Enable Agentforce in Salesforce Go
The next step is enabling Agentforce within your Salesforce environment. This activates the core infrastructure behind Salesforce Agentforce AI, enabling organizations to build autonomous lead engagement workflows.
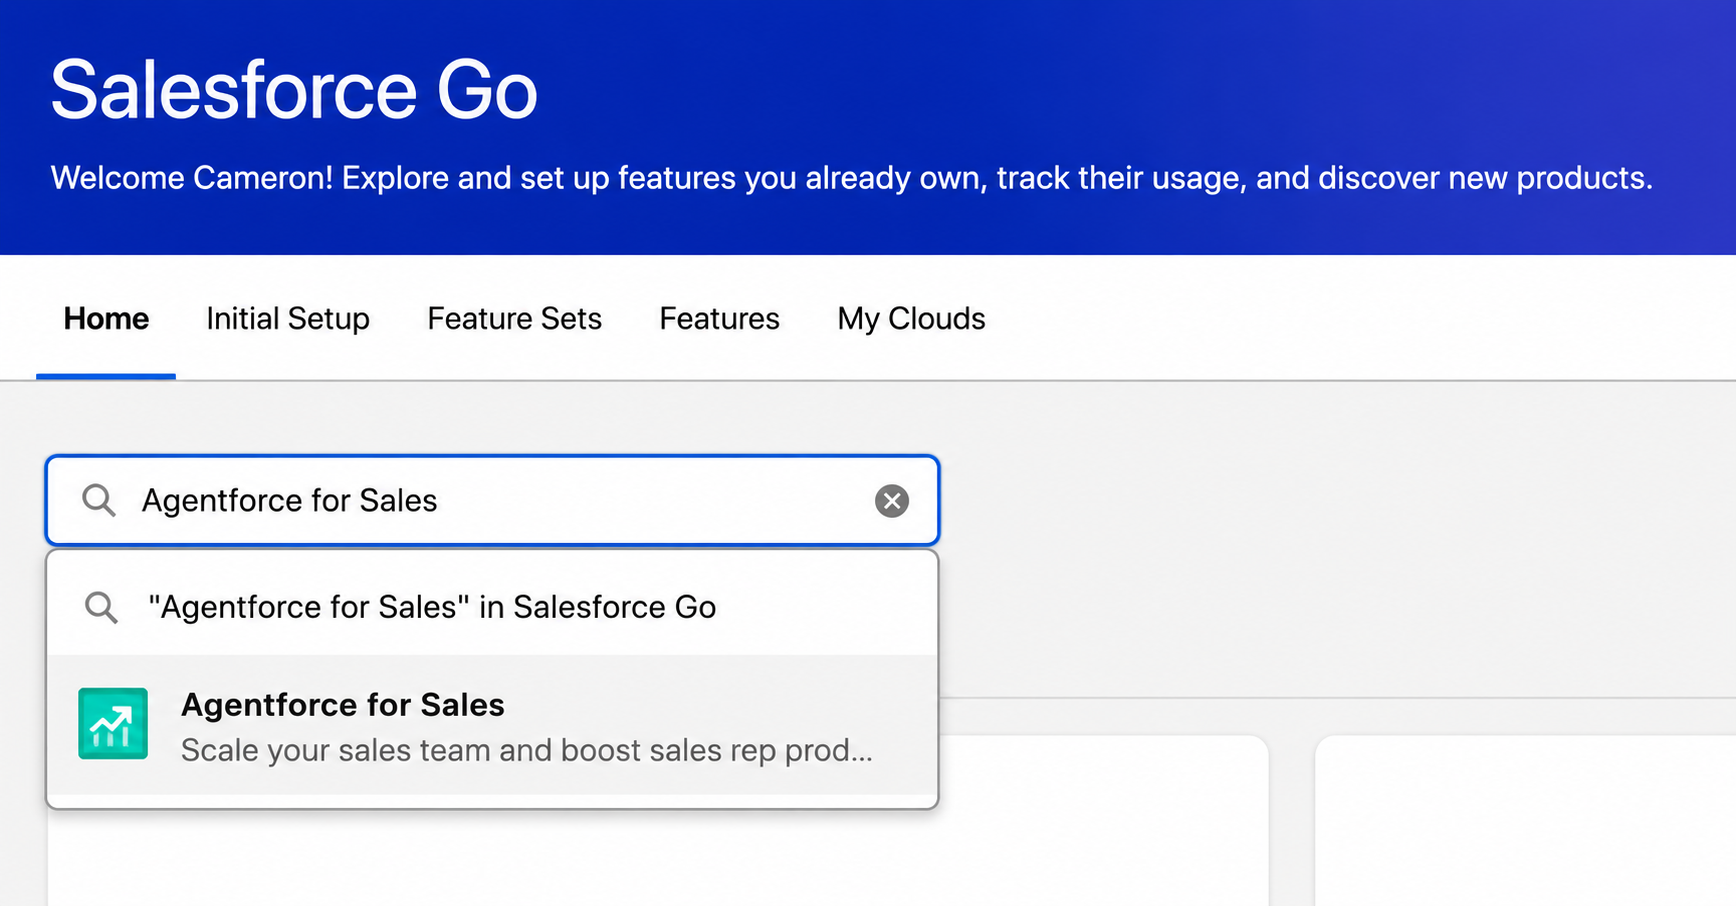
To enable Agentforce:
Open Setup in Salesforce.
Navigate to Salesforce Go.
Search for Agentforce for sales inside Salesforce Go.
Click Turn On and confirm the activation.
Once enabled, Salesforce automatically prepares the backend services and configurations required for Agentforce functionality.
Step 3: Turn On Agentforce Lead Nurturing
(image source: Trailhead)
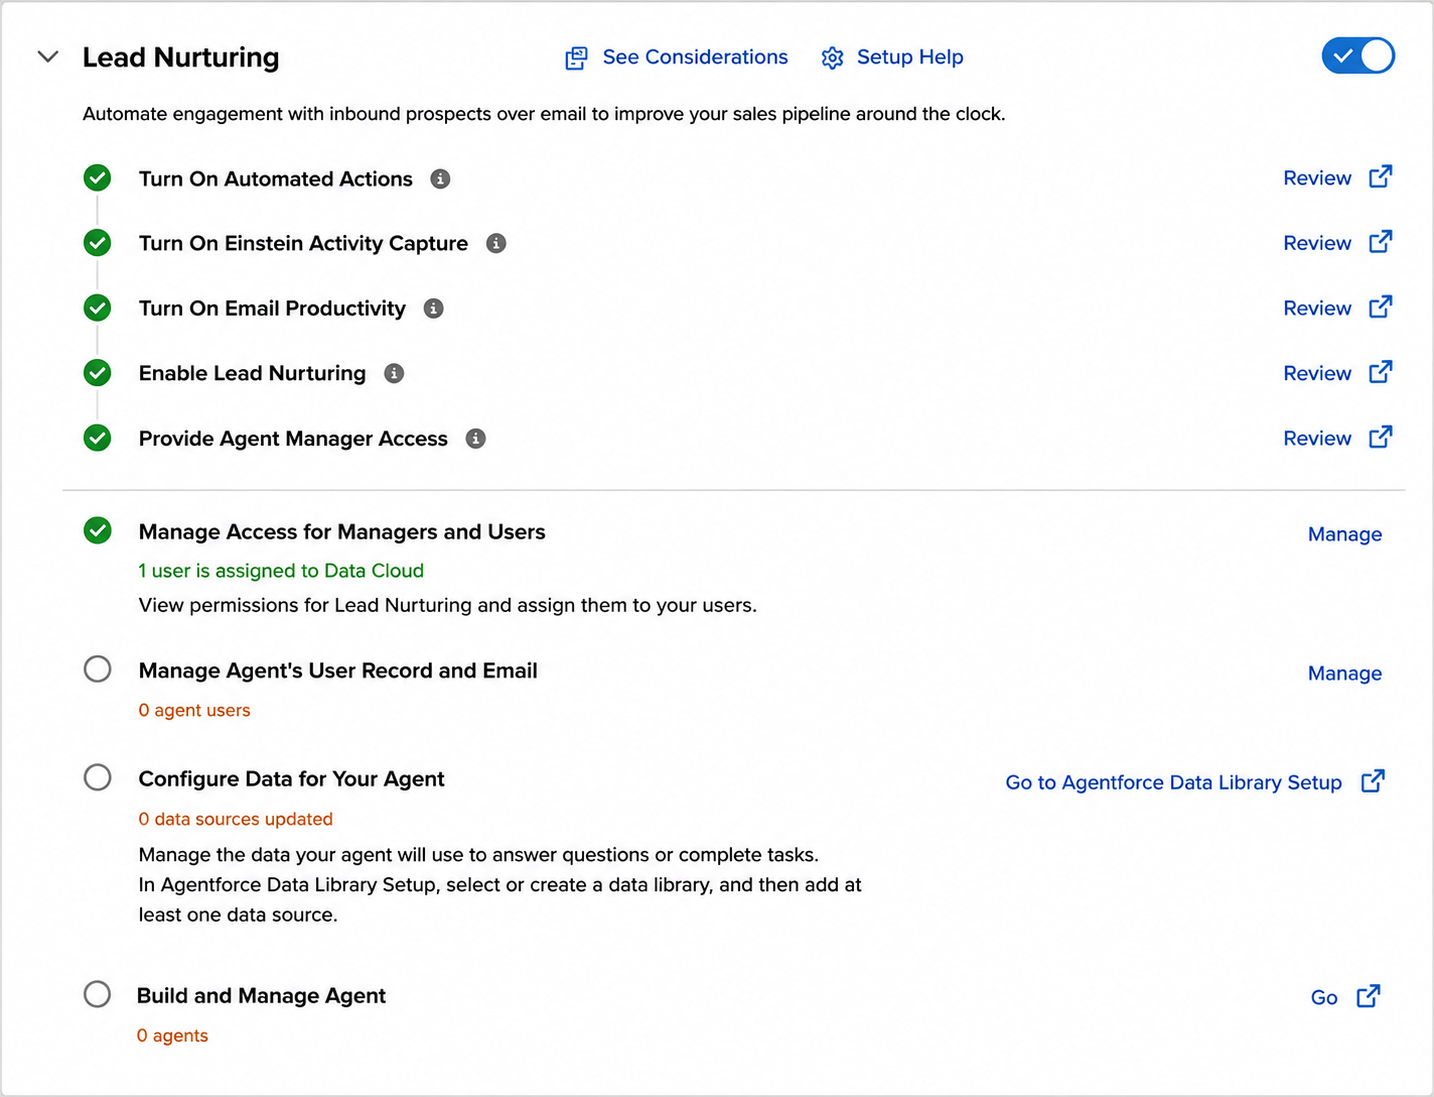
After enabling Agentforce, you can activate the Lead Nurturing agent template using Salesforce Go. The guided setup experience simplifies the entire configuration process and automatically enables the supporting services required for AI-driven outreach.
To enable Lead Nurturing:
Open the Agentforce for Sales page.
Navigate to the Start with an Agent Template section.
Toggle on Lead Nurturing.
Click Confirm.
During activation, Salesforce enables services such as Einstein Activity Capture, Salesforce Inbox, and Data 360 integrations.
Step 4: Assign User Access and Permissions
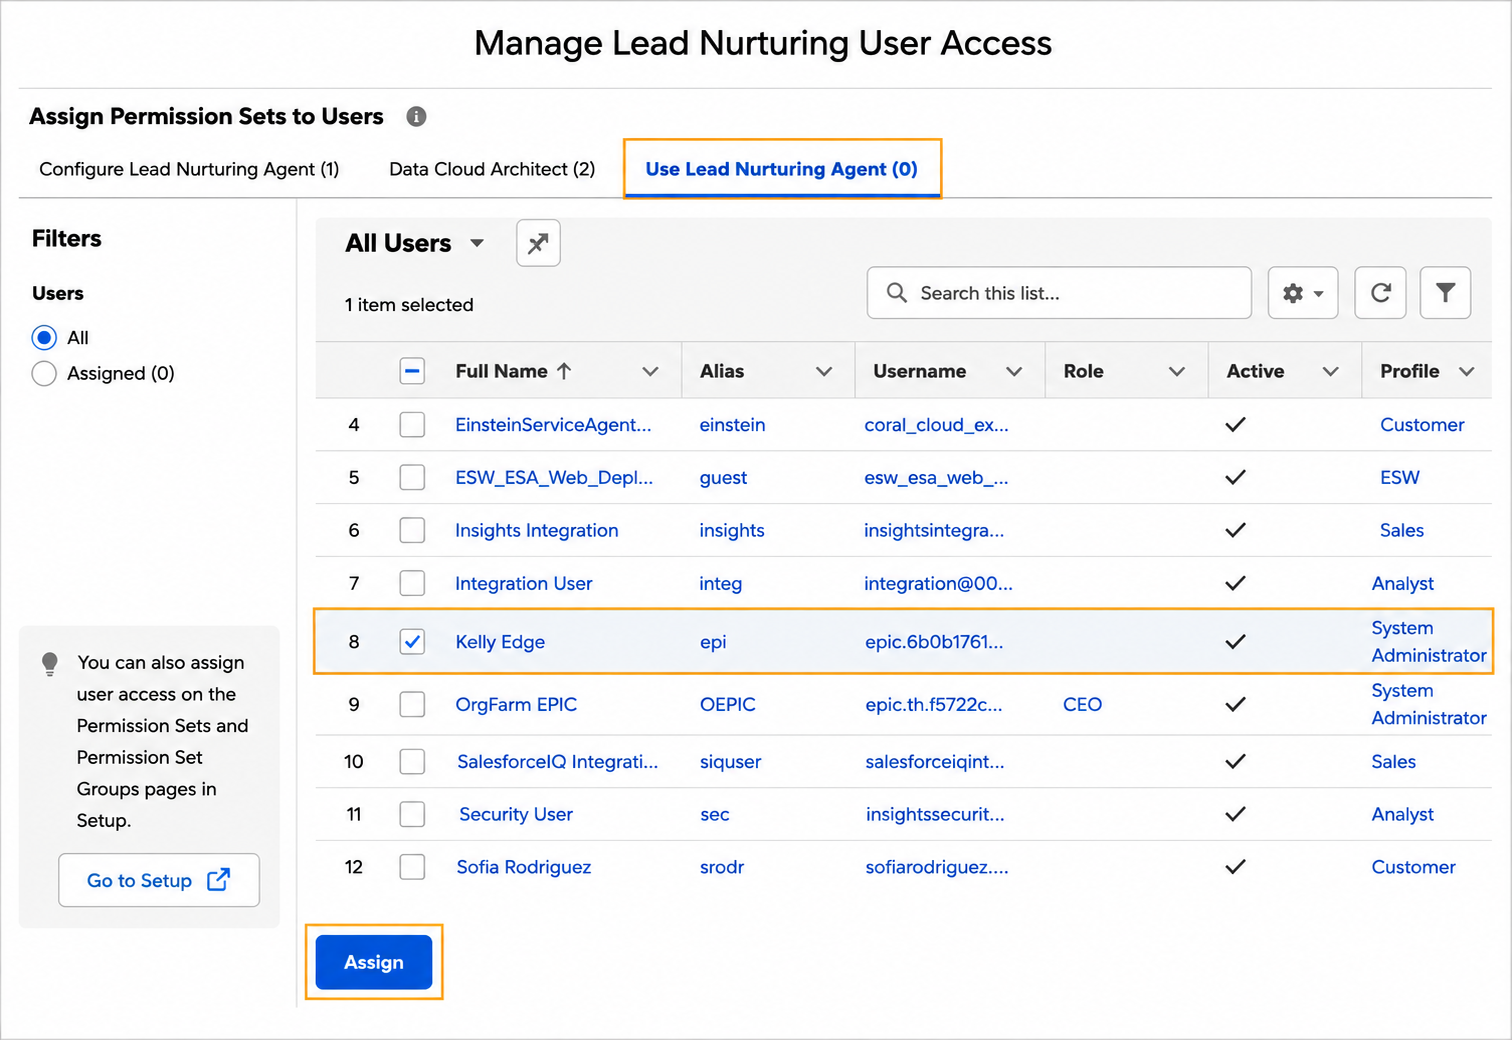
Once the Lead Nurturing agent is enabled, configure user permissions to allow administrators and sales teams to manage the AI agent securely.
To configure access:
Open Manage Access for Managers and Users.
Select the users who need access.
Assign the required permission sets.
This allows teams to:
Configure the AI agent
Monitor conversations and outreach
Review analytics and engagement performance
Manage AI-driven workflows securely
Step 5: Configure the Agent User and Email
Agentforce operates through a dedicated Salesforce user profile called the “agent user.” This profile acts as the AI representative responsible for sending outreach emails, scheduling meetings, and handling conversations with prospects.
To configure the agent user:
Open the Manage Agent’s User Record and Email.
Create a new agent user or select an existing user profile.
Configure Salesforce Inbox and Einstein Activity Capture.
Connect your business email account and calendar.
This setup enables the AI agent to:
Send personalized emails.
Track customer interactions.
Schedule meetings automatically.
Maintain conversation continuity.
Step 6: Configure the Data Library
For accurate and context-aware responses, Agentforce relies on connected business data and knowledge sources. Configuring the Data Library gives the AI agent access to the information it needs during customer interactions.
To configure the data library:
Open Agentforce Data Library Setup.
Create a new data library.
Add web sources, files, knowledge articles, or internal documents.
Enable web search if needed.
Organizations commonly connect:
Product documentation.
Support policies.
Internal knowledge bases.
Customer service resources.
This helps the AI agent generate more personalized and accurate responses.
Step 7: Build and Customize the AI Agent
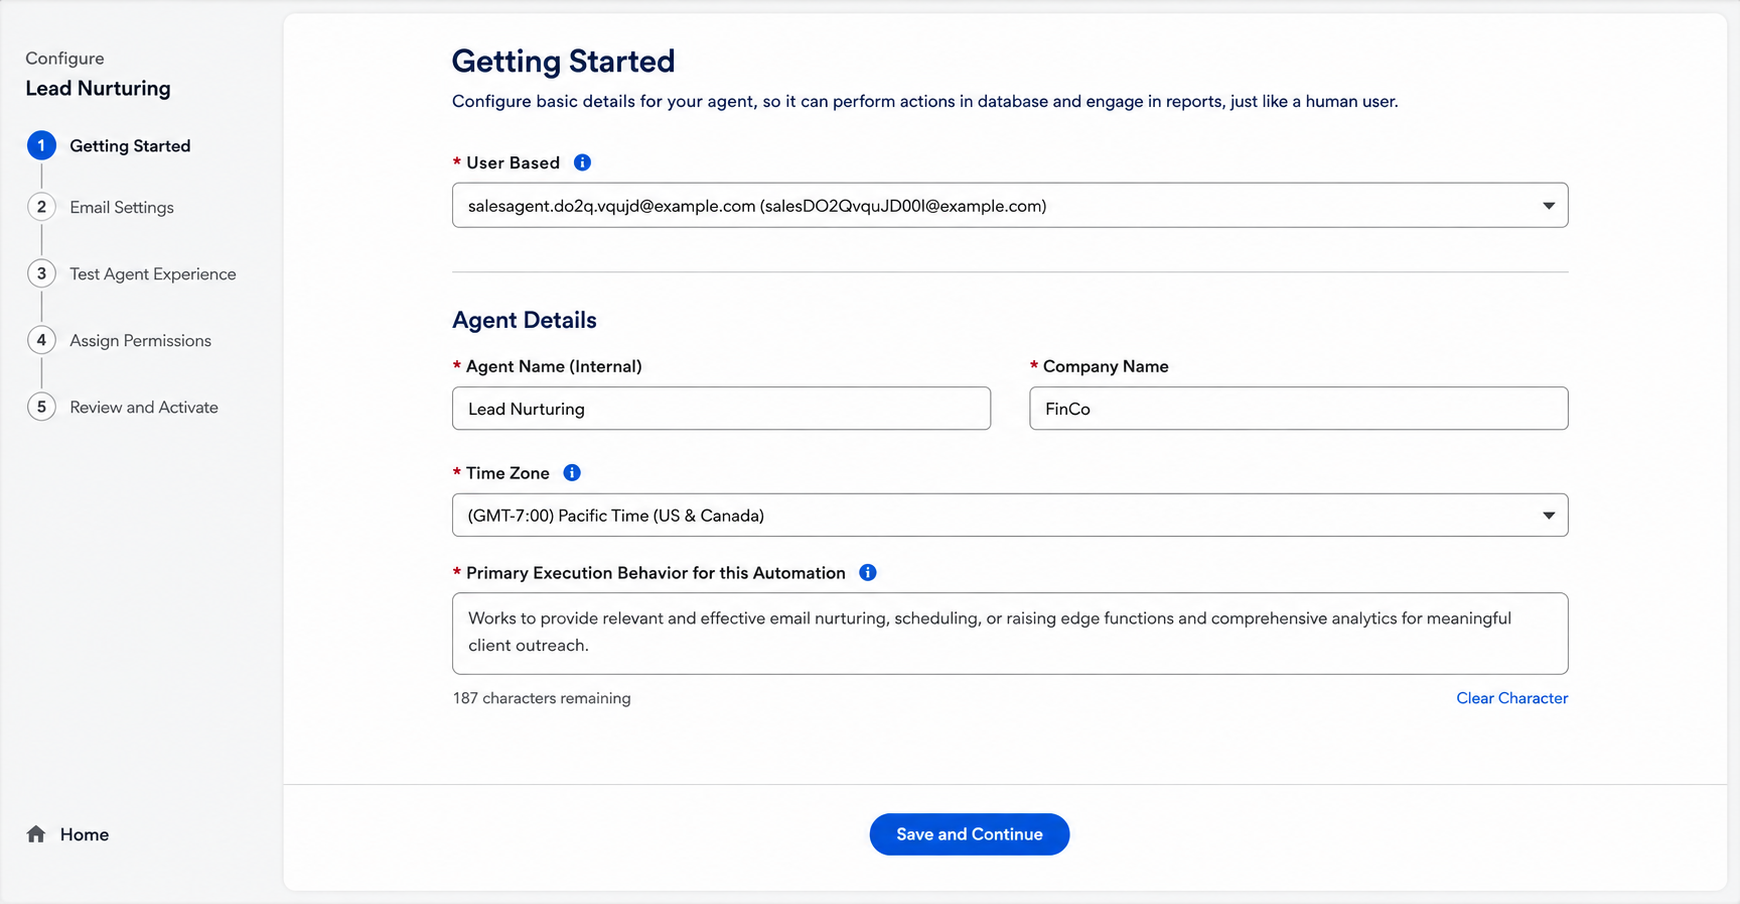
After completing the foundational setup, you can build the Lead Nurturing agent inside Agentforce Studio.
During setup, configure:
During this step, configure:
Agent name and company information
Business overview and outreach goals
Messaging tone and communication style
Value propositions and proof points
Follow-up nudges and engagement settings
Customer success highlights and achievements
These configurations help align AI-generated outreach with your brand voice and business goals.
Step 8: Configure the Email Settings
After creating the AI agent, configure the email settings to define how Agentforce communicates with prospects. In this step, you can set up the primary value proposition, proof points, messaging tone, and automated follow-up nudges.
Once the details are added:
Review the generated outreach email.
Use the Preview Email option to test personalization.
Select a sample recipient and generate the preview.
Verify the messaging and continue to the next step.
This helps organizations improve personalization and enable smarter AI journey orchestration across lead nurturing workflows.
Step 9: Test Agent Responses and Outreach
Before activating the AI agent, test how it responds to prospect questions and outreach scenarios. Salesforce provides built-in preview and testing capabilities that allow teams to validate AI-generated responses before deployment.
Testing helps verify:
Email personalization accuracy
Response relevance
Data grounding quality
Conversation tone and consistency
This step helps identify any configuration or messaging gaps before going live.
Step 10: Assign Prospects To Your AI Agent
At this stage, you can configure lead assignment rules for the AI agent. Salesforce allows businesses to automatically assign prospects based on qualification logic, engagement signals, and customer intent.
You can create assignment rules based on factors such as:
The prospect’s industry or business type
Lead scores and qualification ratings
Customer behavior and interaction history
Engagement activities like email responses or demo requests
Once the setup is complete:
Review all configurations.
Test final workflows.
Go to the review and Activate Agent step.
Step 11: Review and Activate the Agent
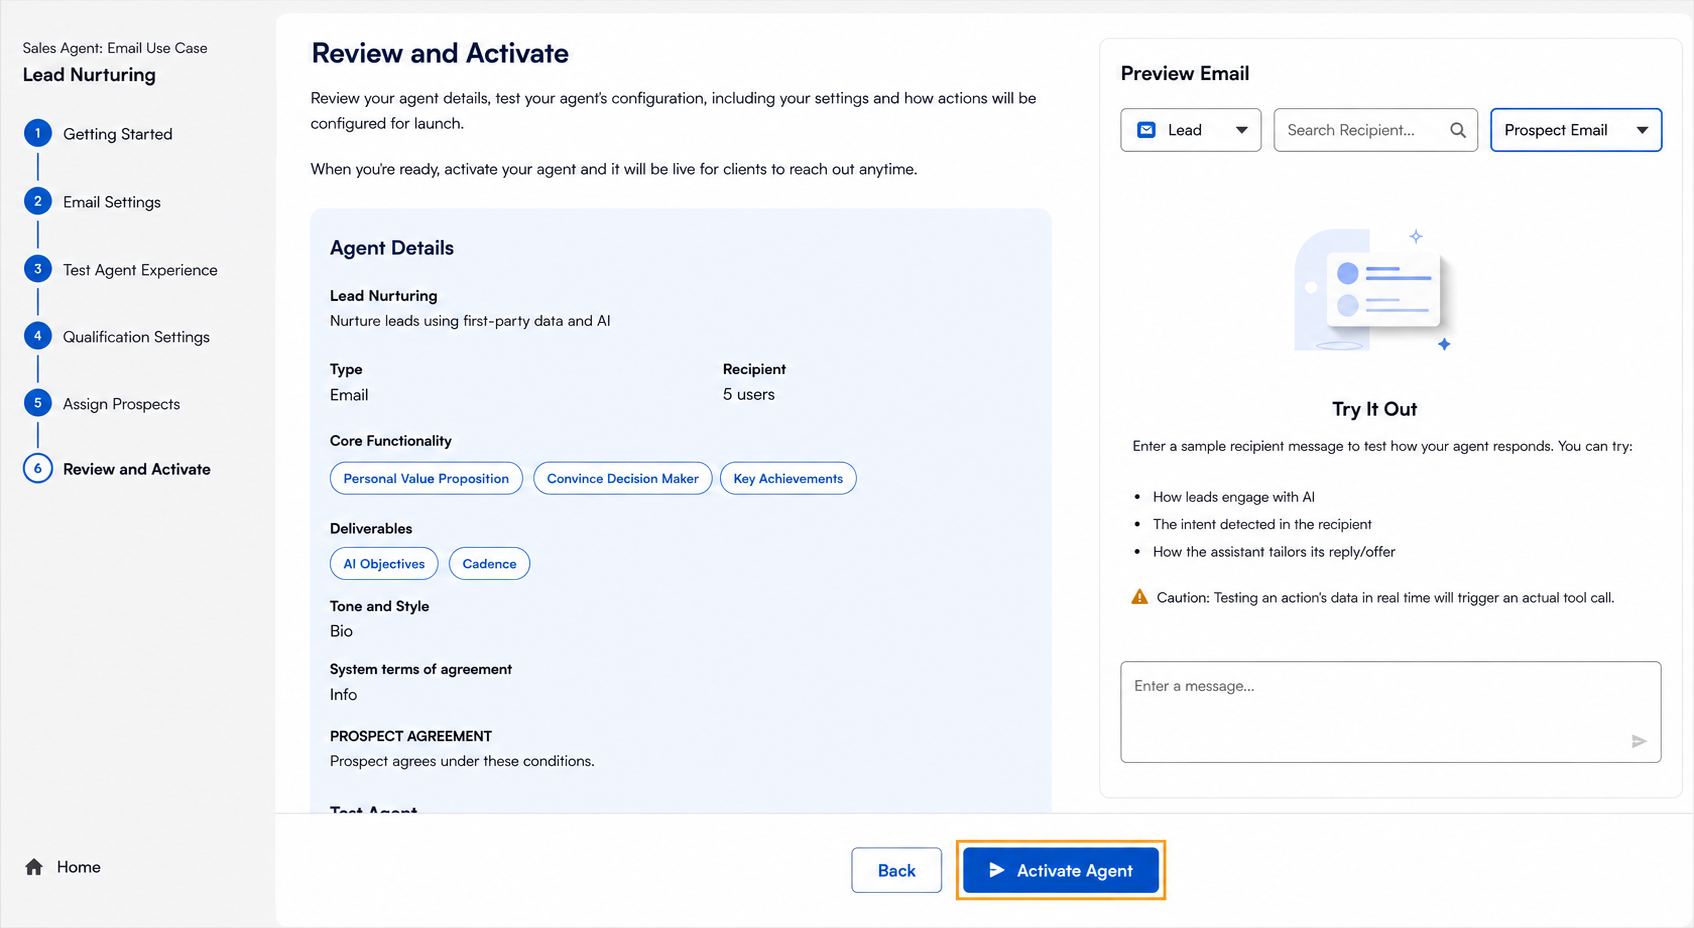
The final step is to review all configurations and test how the AI agent handles outreach, follow-ups, and customer responses. Use the Preview Email section to verify messaging accuracy and response quality.
Once everything looks correct, click Activate Agent to launch Agentforce Lead Nurturing and start automating lead engagement workflows.
After activation, Agentforce Lead Nurturing can autonomously engage leads, qualify prospects, send follow-ups, and seamlessly route sales-ready opportunities to your sales team in real time.
Lead Qualification Mistakes That Reduce Conversions
Even with AI-powered lead nurturing, poor qualification strategies can still hurt conversions and pipeline growth. Many businesses lose high-intent prospects because of delayed responses, weak qualification criteria, and inconsistent follow-ups.
The table below highlights some of the most common lead qualification mistakes and how they affect conversions
| Mistake | Impact on Conversions |
|---|---|
| Slow Follow-Ups | High-intent leads may lose interest or switch to competitors before sales teams respond. |
| Treating Every Lead the Same | Generic outreach reduces engagement and personalization. |
| Weak Qualification Criteria | Poor lead scoring can cause sales teams to prioritize the wrong prospects. |
| Too Many Low-Quality Leads | Sales reps spend time on leads that are unlikely to convert. |
| Lack of Personalized Outreach | Irrelevant messaging lowers response and engagement rates. |
| Inconsistent Lead Nurturing | Missing follow-ups can result in lost sales opportunities. |
| Manual Qualification Processes | Manual workflows slow down lead management and reduce scalability. |
Wrapping Up
Agentforce Lead Nurturing helps businesses automate lead engagement, improve qualification accuracy, and accelerate sales conversions with AI-powered workflows. By combining personalized outreach with intelligent automation, organizations can build more efficient and scalable lead nurturing processes.
Looking to implement AI-powered lead nurturing in Salesforce? Explore professional Salesforce Development Services to build, customize, and optimize your Agentforce solutions for better customer engagement and pipeline growth.
Frequently Asked Questions
-
Agentforce Lead Nurturing (formerly Agentforce SDR) is an AI-powered Salesforce agent that automates lead engagement, qualification, follow-ups, and prospect communication using generative AI and autonomous workflows.
-
Agentforce improves conversions by enabling faster follow-ups, personalized outreach, automated lead nurturing, and intelligent prospect qualification, helping sales teams focus on high-intent opportunities.
-
Industries such as SaaS, healthcare, finance, retail, manufacturing, and professional services can use Agentforce to automate sales engagement and lead qualification workflows.
-
Professional Salesforce Development Services help businesses customize Agentforce workflows, integrate CRM and Marketing Cloud systems, optimize AI automation, and build scalable lead nurturing solutions tailored to business needs.
Related Reading
Let’s Talk

Drop us a note, we’re happy to take the conversation forward 👇🏻