
Consent Management in Marketing Cloud Next: Mapping vs. Matching
Key Takeaways:
Subscription Model: Manages consent through Data Cloud subscriptions.
Consent Mapping: Links Engagement lists to Next subscriptions.
Consent Matching: Syncs opt-outs between Pardot and Next.
In Salesforce Marketing Cloud Next, consent management occurs at the subscription level and is associated with specific contacts, such as email addresses and phone numbers, by using Communication Subscription Consent Data Model Objects (DMOs) in Data Cloud. Organizations maintain consent data across multiple Salesforce products and synchronize it.
Marketing Cloud Next provides two mechanisms for this: Consent Mapping, which connects source data streams to the unified consent data model, and Consent Matching, which synchronizes global opt-out status between Account Engagement and Marketing Cloud Next.
This guide walks through both consent options available in Salesforce Marketing Cloud today.
Understanding Consent: Management, Mapping & Matching
Before exploring the differences, it's important to understand the three key consent concepts in Marketing Cloud Next.
Consent Management: the process of capturing, recording, and updating a customer's privacy and subscription preferences. It is the customer-facing layer of consent compliance.
Consent Mapping: Consent Mapping is the backend process of linking consent status from source systems like Marketing Cloud Engagement lists to communication subscriptions in Marketing Cloud Next.
Consent Matching: Consent Matching is the technical mechanism that matches consent status for a single identity across platforms and synchronizes opt-out records between Account Engagement (Pardot) and Marketing Cloud Next.
If you're working across platforms in Salesforce Marketing Cloud, understanding these tools will save you a lot of headaches.
Consent Mapping vs. Consent Matching in Marketing Cloud Next
In Salesforce Marketing Cloud, Consent Mapping is what links your traditional engagement lists (think publication or engagement lists) to communication subscriptions in Marketing Cloud Next.
Consent Matching works a bit differently: it syncs global, high-level email opt-out statuses between Account Engagement (Pardot) and Marketing Cloud Next by creating one unified B2B Email Consent subscription.
Not sure which one's right for you? Take a closer look at Marketing Cloud Engagement vs. Account Engagement (Pardot).
Here's a quick breakdown of the key differences:
| Feature | Consent Mapping | Consent Matching |
|---|---|---|
| Source Platform | Marketing Cloud Engagement (Classic SFMC) | Account Engagement (Pardot) |
| Primary Goal | Links standard/publication lists from Engagement to specific communication subscriptions in Marketing Cloud Next | Synchronizes global email opt-out status by creating a B2B Email Consent subscription in Marketing Cloud Next |
| Granularity | Supports list-level and subscription-level preferences | Handles overall/global email opt-outs only; does not sync list-level choices |
| Setup Location | Configured via the Consent tab inside the Marketing app | Enabled via the Optimizer inside Account Engagement Settings |
| Action Trigger | Clicking Map Consent on specific channel cards (Email/SMS) | Selecting match options on the Prospect Email Opted Out field |
Before diving into the configuration, let’s look at how Consent Mapping connects consent data across Marketing Cloud Engagement and Marketing Cloud Next.
How Does Consent Mapping Connect Consent Across Platforms?
Consent Mapping connects privacy choices across platforms by linking list membership in Marketing Cloud Engagement to a communication subscription in Marketing Cloud Next, syncing status automatically between both systems.
Identity Linking: Maps consent to a unified individual using contact points, like an email address or phone number.
Signal Translation: Converts list membership into subscription-level consent status in Marketing Cloud Next.
API Synchronization: Automatically syncs status changes in both directions between the two platforms.
Behavior Enforcement: Restricts sends so only contacts with an active opt-in for a mapped subscription are targeted.
Core Components
Consent Tab: Where lists are mapped to subscriptions using the Map Consent button.
Communication Subscription: Stores a contact's consent for a specific communication type.
Communication Subscription Consent DMO: Records consent status, date, and source for each mapped contact.
But how does that consent actually move between Account Engagement and Marketing Cloud Next? Let’s break down the matching options and how each one works.
How Does Consent Matching Keep Email Consent in Sync?
Consent Matching keeps email consent aligned between Account Engagement and Marketing Cloud Next for records that share an email address. Matching is available from one business unit to another. Multiple business units aren’t supported.
You can match consent based on one of two match types: Public List and Opted Out Field.
| Match Type | Description | How It Works |
|---|---|---|
| Public List | Matches a selected Account Engagement public list with a unique communication subscription in Marketing Cloud Next. | Consent syncs between the matched list and subscription. Global email opt-out in Account Engagement can still unsubscribe the prospect from all email subscriptions. |
| Opted Out Field | Creates a single B2B Email Consent subscription to track overall email consent. | Changes to the B2B Email Consent subscription sync with the Opted Out field in Account Engagement, and vice versa. |
Now that we understand how Consent Mapping works, let’s look at how to configure it.
How to Configure Consent Mapping in Marketing Cloud Next
The next-gen marketing app uses communication subscriptions to manage list membership. To share consent between Marketing Cloud Next and Marketing Cloud Engagement, you'll map engagement lists and publication lists to communication subscriptions for email and SMS.
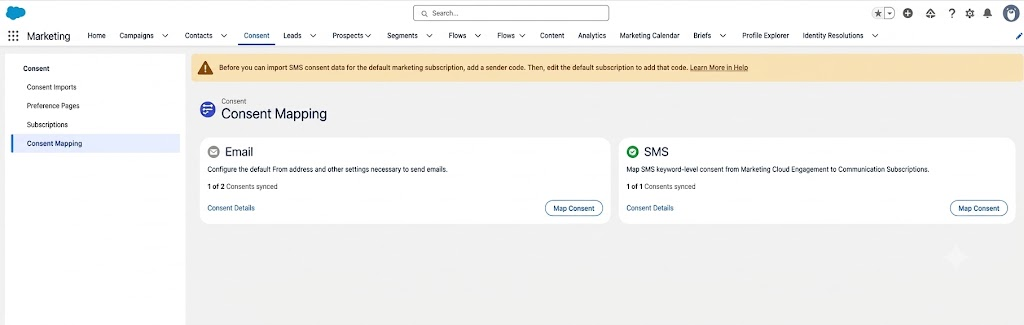
Before you begin, make sure Marketing Cloud Engagement is properly connected.
Prerequisites
This is the quick list; just ensure that you have:
Marketing Cloud Engagement linked to Marketing Cloud Next
The Engagement lists you need, lists or publications, ready to go.
The right identified subscription communications
A Sender Code available for SMS mappings
If your org uses business units, the business unit that is identified as relevant
Configuration Steps
Step 1: Open Consent Mapping
In the Marketing app, go to the Consent tab and click on Consent Mapping
Step 2: Select the communication channel
Now find the channel you want to set up and click Map Consent.
Step 3: Choose Business unit if available
If your organization uses the business unit, go with the business unit for configuration.
Step 4: Select the SMS sender code
For SMS consent mapping, pick the right Sender Code.
Step 5: Select the consent source
Choose one or more engagement lists or publication lists.
Step 6: Add a communication subscription
Select Add Subscription and create the matching communication subscription in Marketing Cloud Next.
Step 7: Add configuration setup to the consent mapping
Open Consent Details and map each selected Engagement list to its matching communication subscription.
Step 8: Verify the mapping and complete the setup
Additionally, make sure lists, subscriptions, channels, and other details are all correct. You can also rename the communication subscription here if you need to. And click Map Consent.
With the matching options clear, let’s walk through the configuration process.
How to Configure Consent Matching in Marketing Cloud Next with Account Engagement
Prerequisite knowledge
Ensure Marketing Cloud Next and Data 360 are in place.
Ensure you have the Account Engagement permissions required to handle email consent matching.
Select the Account Engagement business unit to synchronize consent.
Choose whether to use Public List or Opted Out Field for your matching method.
1: Open Account Engagement Settings
In Account Engagement Settings, select the Business Unit you want, then go to Optimizer > Enable Marketing Cloud.
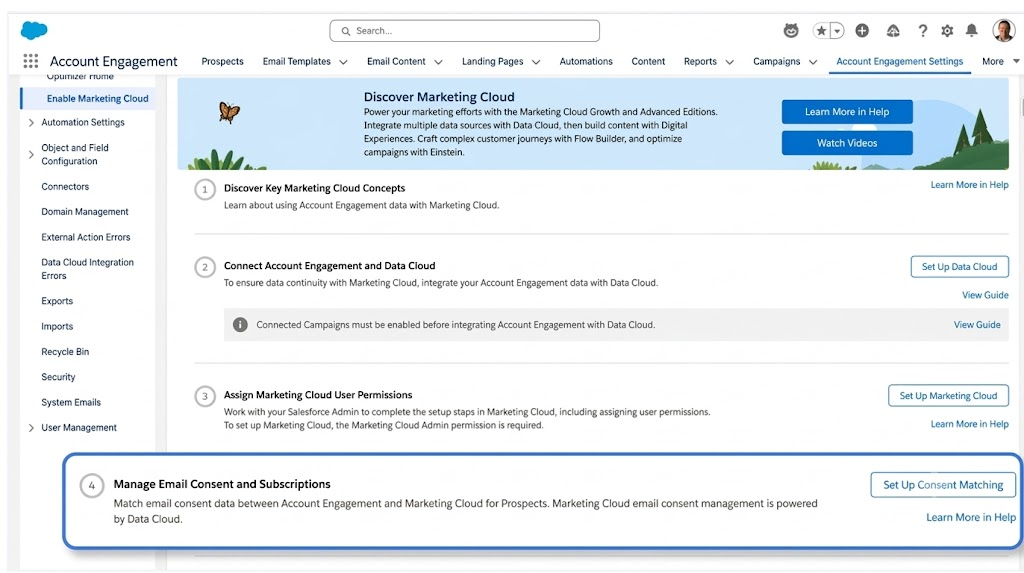
2: Open Email Consent Matching and start the setup
Select Manage Email Consent and Subscriptions, then Set Up Consent Matching. On the Set Up Email Consent Matching page, select Get Started.
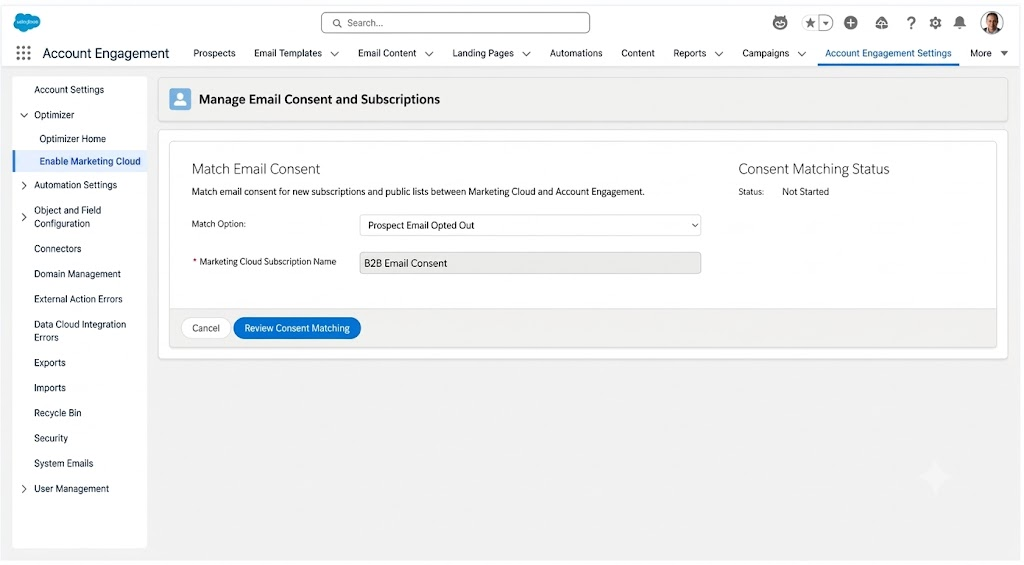
3. Under Match Type, select Opted Out Field or Public List.
4: Configure Public Lists, if you picked that option
If you selected Public List, configure your communication subscriptions.
Select up to 100 public lists to match.
For each list, enter a unique name for the communication subscription to create in Marketing Cloud Next. You can't map a public list to an existing subscription.
5: Review the configuration
Review your selections, confirm that you understand how consent matching works, and click Match Consent.
Note:
Updates can take up to 48 hours, and you'll see initial progress in the status field. Hold off on importing new consent records until it's done. Once finished, the status shows Active, and you'll get a confirmation email.
Configuration is only the starting point. Once matching is active, you may need to manage its settings as your consent model changes.
How Do You Manage and Keep Consent Matching Up to Date?
Once Consent Matching is up and running, you can check its status anytime, add or remove public lists, or pause matching whenever you need to.
If you stop matching, don't worry, your existing consent data sticks around; it just won't sync between Account Engagement and Marketing Cloud Next anymore.
| Task | Steps |
|---|---|
| Start matching a new list | Head to the Email Consent Matching page, select New, pick a list, hit Next, name your subscription, and select Match Consent. |
| Stop matching a single list | Open the Settings menu next to the list and select Stop Matching. |
| Stop matching all lists | Select Stop Matching from the page header, look over the confirmation, and select Stop. |
| Restart matching | You'll need to delete or rename the affected communication subscription in Marketing Cloud Next first, then restart consent matching. |
Both approaches synchronize consent, but they solve different problems. So, which one fits your setup?
Consent Mapping vs. Consent Matching: Which One Should You Use?
It really comes down to one question: where's your consent coming from?
Coming from Marketing Cloud Engagement? Go with Consent Mapping to connect your lists or publication lists to communication subscriptions in Marketing Cloud Next. Coming from Account Engagement? You'll want Consent Matching to keep email consent in sync with Marketing Cloud Next.
That said, the source platform isn't the only thing that sets them apart. Consent Mapping works at both the list and subscription level, covering email and SMS. Consent Matching, meanwhile, is limited to email consent, with Public Lists or the Opted Out Field.
So here’s the short version to remember:
Marketing Cloud Engagement → Marketing Cloud Next = Consent Mapping; Account Engagement → Marketing Cloud Next = Consent Matching
Conclusion
At the end of the day, Consent Mapping and Consent Matching are there to solve two different problems in the Salesforce Marketing Cloud when it comes to keeping consent in sync with Marketing Cloud Next. Mapping is your go-to for connecting Marketing Cloud Engagement, while Matching handles aligning email consent with Account Engagement (Pardot).
Which one you pick really just depends on where your consent is coming from and what you need it to sync. Need help with Salesforce consent management? Talk to our Salesforce consultants today.
Frequently Asked Questions
-
Email consent synchronization keeps customer email preferences aligned between Marketing Cloud Next and connected platforms such as Account Engagement. Changes to consent can be synchronized based on the configured matching method.
-
When a prospect’s consent status changes, the update is synchronized between Account Engagement and Marketing Cloud Next according to the configured Consent Matching option.
-
B2B Email Consent is a communication subscription used to track a prospect’s overall email consent when the Opted Out Field matching option is configured.
-
Before enabling Consent Matching, review and prepare existing consent data, confirm the required subscription structure, and ensure the source consent data is ready for synchronization.
-
A consent migration plan should cover existing consent sources, subscription mapping, consent history, data preparation, synchronization, and validation after migration.
-
Yes. Consent Matching can help synchronize email consent between Account Engagement and Marketing Cloud Next after the required setup and matching configuration are in place.
-
Consent Mapping connects Marketing Cloud Engagement lists or publication lists with communication subscriptions, while Consent Matching synchronizes email consent between Account Engagement and Marketing Cloud Next.
-
Review your existing consent data, choose the appropriate matching type, verify your business unit configuration, and plan how existing consent will be handled during synchronization.
Related Readings

Let’s Talk

Drop us a note, we’re happy to take the conversation forward 👇🏻