

How to integrate Salesforce Sales Cloud with Marketing Cloud

Key Summary:
Integration creates a single source of truth for customer data.
Sales and marketing teams gain real-time visibility into customer interactions.
The most widely used method is Marketing Cloud Connect.
What if your sales and marketing teams could see every customer interaction in real time? Many organizations rely on Salesforce Sales Cloud to manage leads and opportunities and Marketing Cloud to deliver personalized campaigns, but when these systems operate in silos, data becomes fragmented, making that unified view difficult to achieve.
To bridge this gap, businesses use several integration approaches, including native integration (Marketing Cloud Connect), API-based integration, and third-party tools. While each has its place, this blog focuses on how to effectively connect Sales Cloud and Marketing Cloud using Marketing Cloud Connect.
What Are the Integration Methods?
Integrating Salesforce Sales Cloud with Salesforce Marketing Cloud enables organizations to synchronize customer data, monitor campaign performance, and deliver personalized communication across multiple channels.
Below are three primary methods used to integrate these platforms:
1. Native Integration (Marketing Cloud Connect)
This is the most common and robust method, using a pre-built managed package provided by Salesforce.
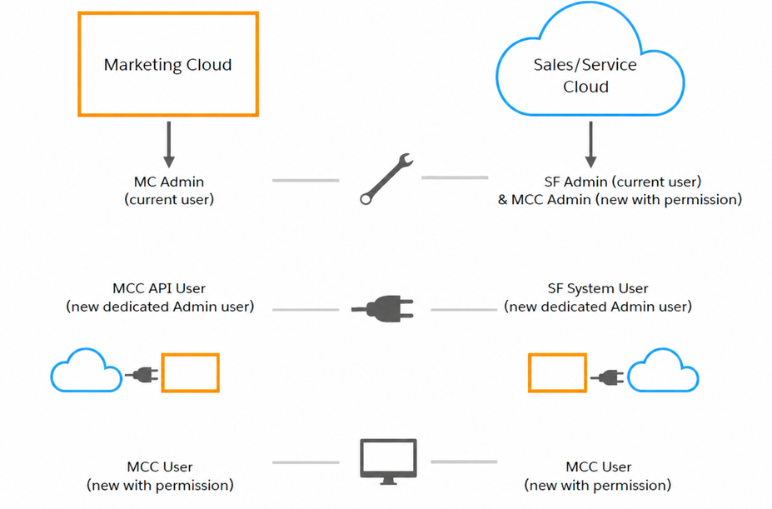
How it works: Marketing Cloud Connect directly links Sales Cloud and Marketing Cloud using a dedicated Marketing Cloud API user, enabling secure data exchange between the two platforms.
Key features
Automatically synchronizes Lead and Contact data between systems
Allows users to send marketing emails directly from Salesforce
Tracks engagement data such as email opens and clicks within the CRM
2. API-Based Integration
API-based integration is used when businesses require more customization than the standard integration features provide. In this approach, developers create custom connections between Salesforce Sales Cloud and Salesforce Marketing Cloud using Salesforce APIs.
How it works:
Developers use REST or SOAP APIs to build custom data flows that allow both platforms to exchange information based on specific business requirements.
Key features
Supports advanced use cases such as triggered sends based on external logic or the integration of multi-channel custom data.
Provides precise control over how and when data is synchronized between systems.
Third-Party Integration Tools
Third-party tools and middleware platforms act as a bridge between the two clouds. They help connect the systems in a simpler way, usually requiring less custom coding than using APIs directly, while still providing more flexibility than native connectors.
These tools make the integration process easier and more manageable, especially when working with multiple systems.
Key features
Middleware / iPaaS: Platforms like MuleSoft (Anypoint Platform), Workato, and Zapier help automate workflows that move data between systems with minimal coding.
Specialized Connectors: Tools such as LeadsBridge or Exalate are designed for specific tasks, such as syncing leads from social media ads directly into Salesforce.
Advanced Analytics: Marketing Cloud Intelligence (formerly Datorama) integrates marketing data to support advanced reporting and ROI tracking.
Among these integration methods, Marketing Cloud Connect is the most commonly used approach to connect Salesforce Sales Cloud with Marketing Cloud.
Step-by-Step: How to Integrate Using Marketing Cloud Connect
Connecting Salesforce Sales Cloud with Marketing Cloud using Marketing Cloud Connect unlocks powerful collaboration between sales and marketing.
The following diagram illustrates the overall integration workflow, highlighting the six key steps involved in setting up Marketing Cloud Connect.

But how does this integration actually work? Let’s walk through the key steps to set it up.
(Source: Salesforce Marketing Cloud Connect Documentation)
Step 1: Verify Prerequisites
Before starting the integration, make sure the following requirements are met:
Supported Salesforce and Marketing Cloud editions
Proper user licenses in both systems
Admin access to configure the integration
Creation of API system users for authentication
Subscriber Key in Marketing Cloud matching Salesforce Contact/Lead ID
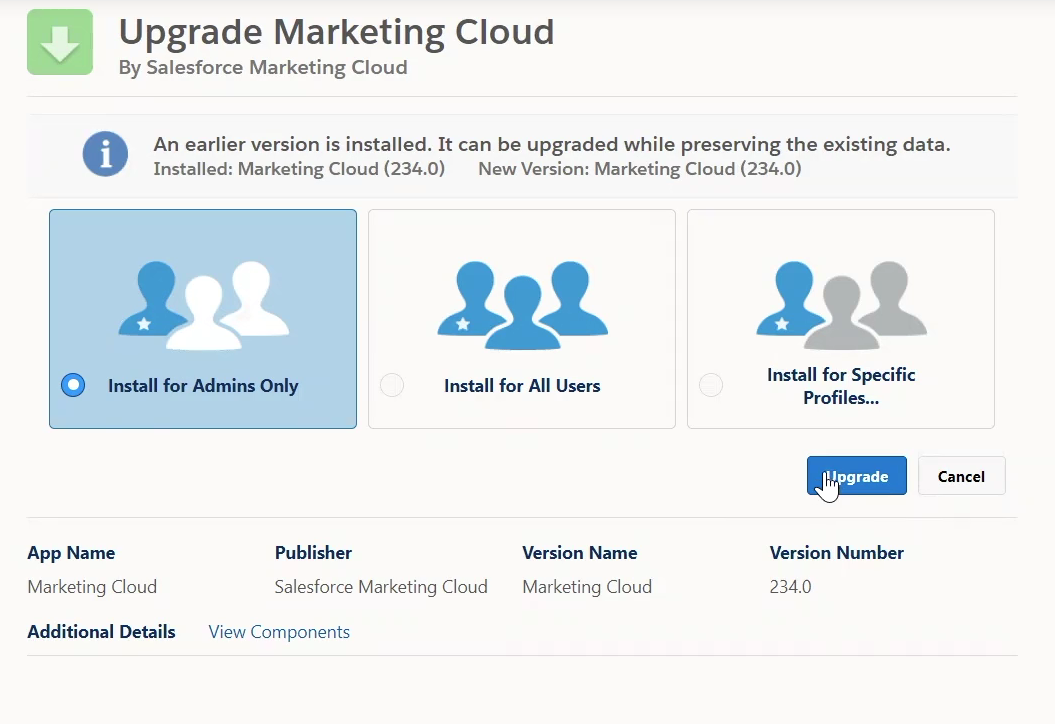
Step 2: Install the Managed Package
Open the installation link for the managed package.
Production: https://sfdc.co/MCC
Sandbox: https://sfdc.co/MCCSandbox
Log in to your Salesforce CRM account using admin credentials.
Select Install for Admins Only.
Click Install and grant access to any required third-party websites if prompted.
Click Continue.
Wait until the installation process is complete before moving to the next configuration step.
Step 3: Configure CRM Settings
After installing the managed package, the next step is to configure CRM settings in Salesforce so Marketing Cloud Connect can work properly.
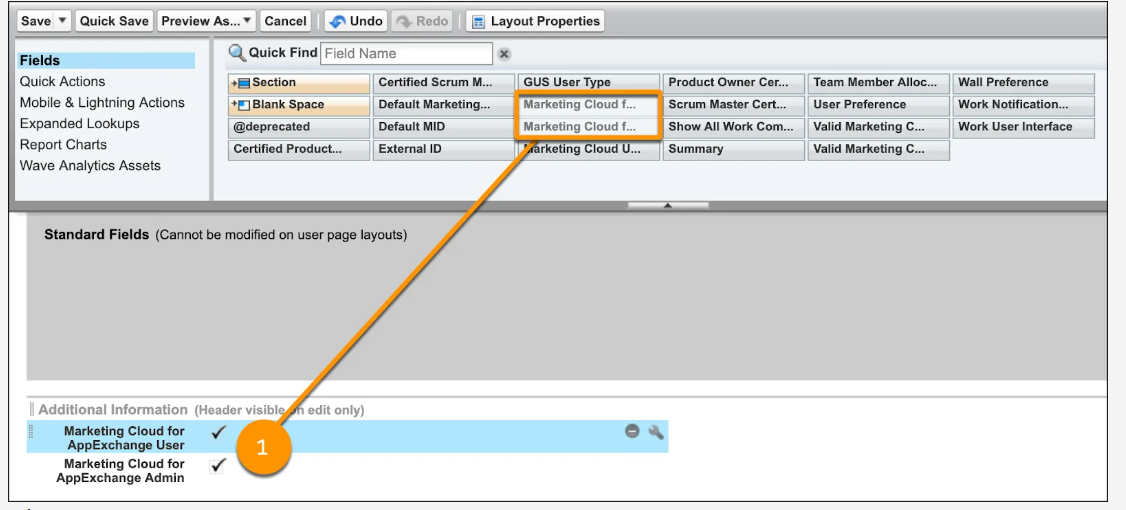
a. Modify User Page Layout
Go to Setup → Users → Page Layouts
Click Edit on User Layout
Add:
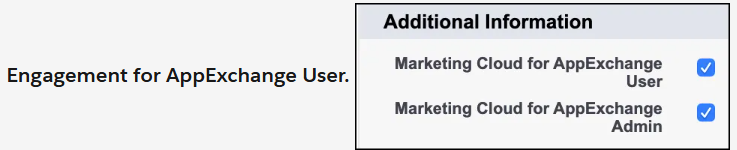
Marketing Cloud Engagement for AppExchange Admin
Marketing Cloud Engagement for AppExchange User
Click Save
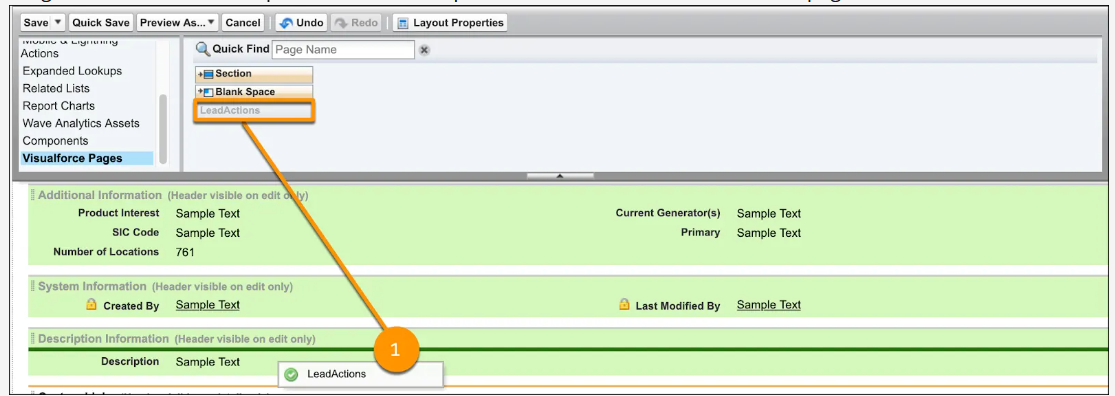
b. Modify Lead Page Layout
Go to Setup → Leads → Page Layouts → Edit
Add the following related lists:
Email Sends
Individual Email Results
Add LeadActions (Visualforce Page)
Click Save
c. Modify Contact Page Layout
Go to Setup → Contacts → Page Layouts → Edit
Add:
Email Sends
Individual Email Results
Add ContactActions (Visualforce Page)
Click Save
d. Grant Permissions to Admin
Go to Setup → Users
Edit the admin user
Enable:
Marketing Cloud Engagement for AppExchange Admin
Marketing Cloud Engagement for AppExchange User
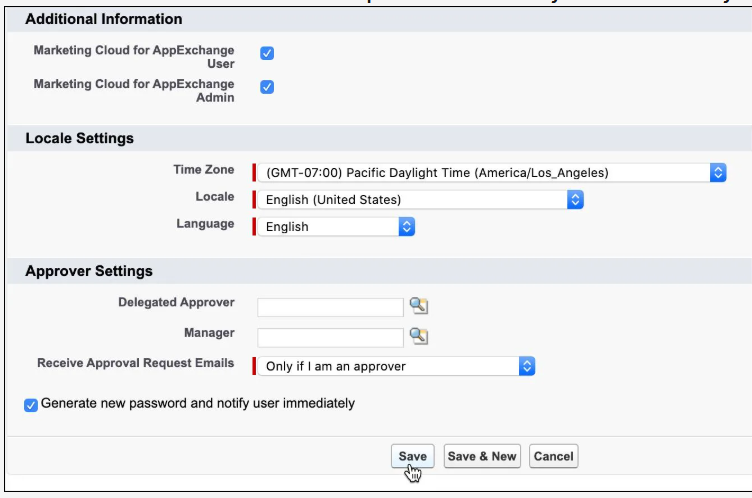
e. Create CRM API User
Go to Setup → Users → New User
Set:
User License: Salesforce
Profile: System Administrator
Enable Marketing User
Save the user
f. Create Permission Set
Go to Setup → Permission Sets → New
Create Marketing Cloud Connected App permission set
Assign it to the CRM API User
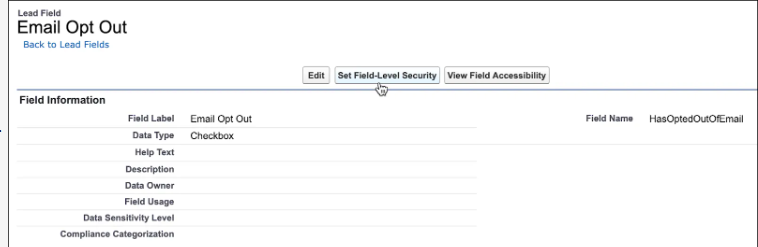
g. Update Field-Level Security
Go to Setup → Leads → Fields
Open Email Opt Out
Click Set Field-Level Security
Enable Visible for required profiles
Repeat the same steps for Contacts
Step 4 – Configure Marketing Cloud Engagement
After configuring Salesforce CRM, the next step is to set up the connection in Marketing Cloud Engagement.
a. Create Marketing Cloud Connect API User
Go to Marketing Cloud → Setup
Search Users
Click Create
Enter:
Email address
Username (example: MC-API-User)
Select API User
Click Save
Assign roles to this user:
Administrator
Marketing Cloud Engagement Administrator
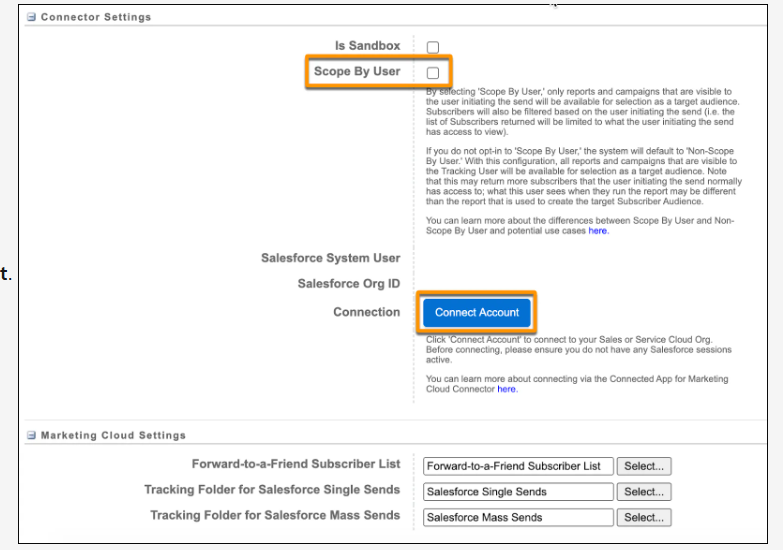
b. Connect Marketing Cloud with Salesforce CRM
Go to Setup → Salesforce Integration
Click Edit
Make sure Scope by User is unchecked
Click Connect Account
Log in using the CRM API User credentials
Click Allow
This creates the connection (handshake) between Marketing Cloud and Salesforce CRM.
Step 5: Finalize Configuration
Now it's time to finalize the configuration of the connected app settings in Salesforce CRM. Log out of Marketing Cloud Engagement and log back in to your Salesforce CRM account using your admin credentials to continue the setup.
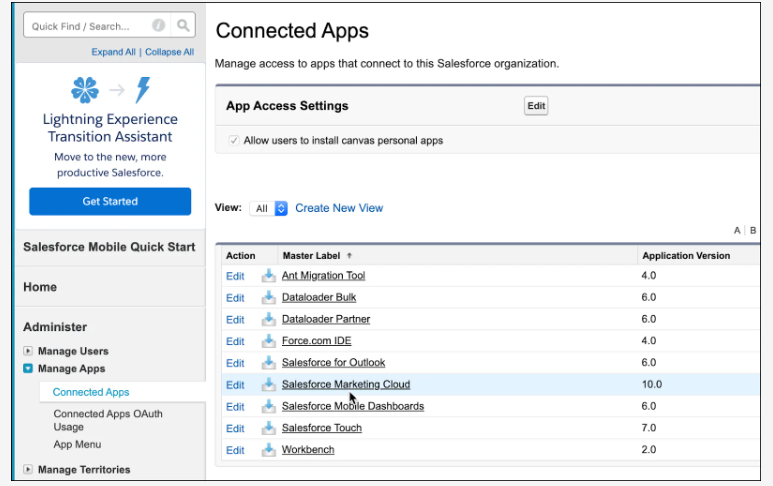
a. Update Connected App Settings
Go to Setup → Connected Apps
Select Salesforce Marketing Cloud Engagement
Click Edit Policies
Set:
Permitted Users: Admin-approved users are pre-authorized
IP Relaxation: Relax IP restrictions
Refresh Token Policy: Immediately expire refresh token
Click Save
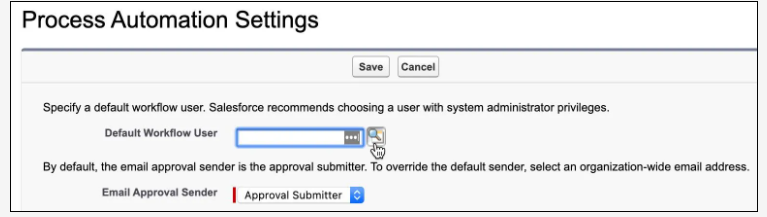
b. Configure Process Automation Settings
Go to Setup → Process Automation Settings
Set the Default Workflow User (recommended: CRM API user)
Click Save
c. Update Session Settings
Go to Setup → Session Settings
Scroll to the bottom and click Save
d. Run the Marketing Cloud Connector Setup Wizard
Go to All Tabs → Marketing Cloud Engagement
Click Start Wizard
Follow the steps and confirm the configuration
Click Configure Marketing Cloud Connector
e. Connect Marketing Cloud Engagement
Open Marketing Cloud Engagement tab
Click Connect to Marketing Cloud Engagement
Enter Marketing Cloud API User credentials
Configure email, tracking, and notification settings
Click Save Settings
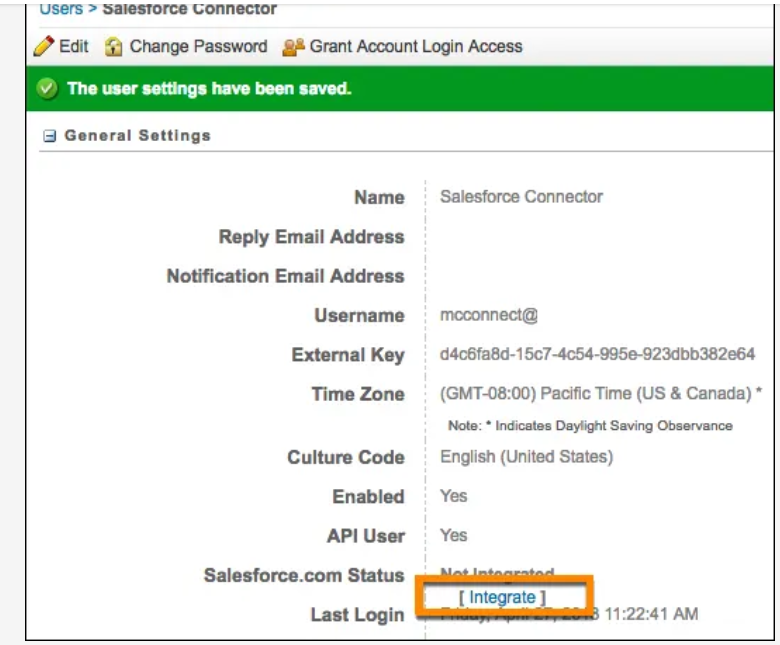
f. Integrate Marketing Cloud Users
Go to Marketing Cloud → Setup → Users
Select the API user
Click Integrate
Enter the CRM API username
Click Save Settings
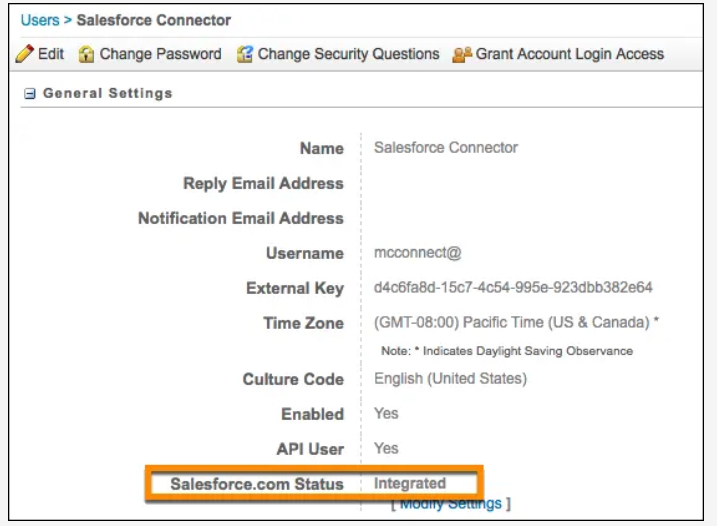
Once completed, Salesforce Sales Cloud and Marketing Cloud are fully configured and ready for integration.
If successful, the Salesforce.com Status updates to Integrated.
Step 6 – Test the Connection
After completing all configurations, the final step is to test the integration to ensure that Salesforce Sales Cloud and Marketing Cloud are working together correctly.
a. Create Field Mapping
Log in to Marketing Cloud Engagement
Go to Email Studio → Subscribers → Profile Management
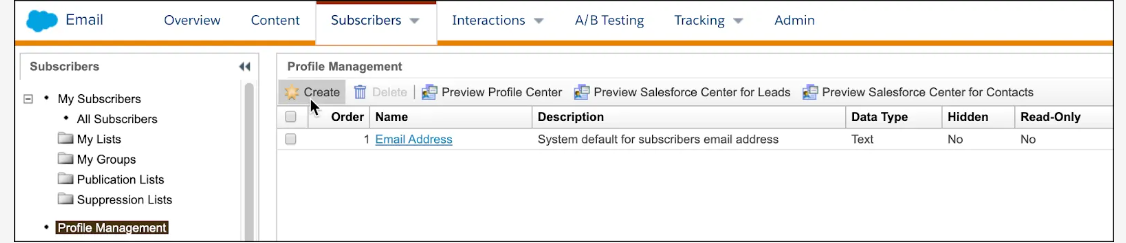
Create attributes such as First Name and Last Name
Map these fields to the corresponding Salesforce Lead and Contact fields
Congratulations-you did it! Marketing Cloud Connect setup is now complete.
b. Create a Test Email
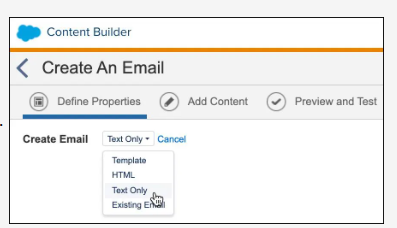
Go to Content Builder
Click Create → Email Message
Choose Text Only
Add a subject and simple email content
Save the email template
c. Create a Test Lead in Salesforce
Log in to Salesforce CRM
Go to Leads
Click New
Enter First Name, Last Name, Company, and Email
Click Save
d. Create a Report for the Test Lead
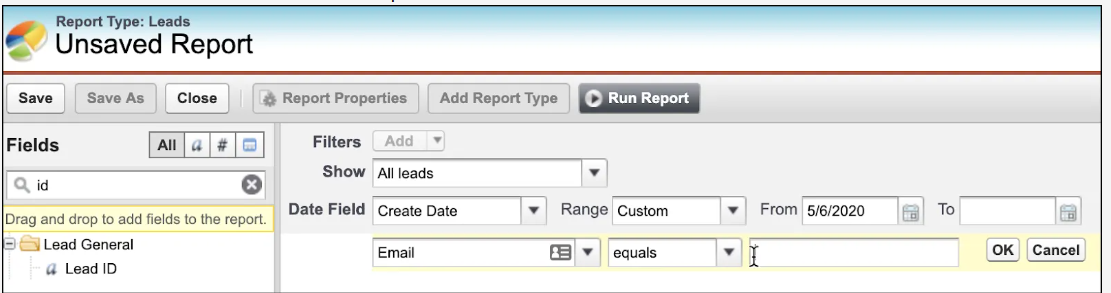
Go to Reports → New Report
Select Leads
Add Lead ID as a column
Filter using the test email address
Save the report
e. Send a Test Email
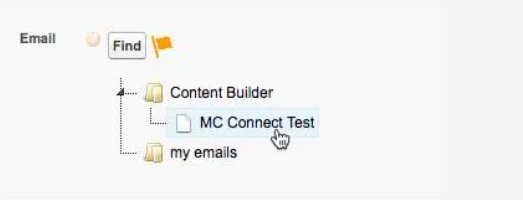
Open the Marketing Cloud Engagement tab in Salesforce
Select the email template created earlier
Choose the test lead report as the recipient source
Click Send
If the configuration is correct, the test email will be delivered to the specified email address, confirming that the integration between Salesforce Sales Cloud and Marketing Cloud is working successfully.
Common Challenges and How to Avoid Them
During the integration of Salesforce Sales Cloud with Marketing Cloud, some common challenges may occur during setup and configuration. Being aware of these issues can help ensure a smoother implementation process.
| Common Challenge | How to Avoid It |
|---|---|
| Incorrect user roles or permissions | Ensure all required users have the correct roles and permission sets in both Salesforce and Marketing Cloud. |
| Subscriber Key mismatch | Use Contact ID or Lead ID as the Subscriber Key in Marketing Cloud to maintain proper data mapping. |
| Incomplete configuration | Carefully follow all setup steps, including page layout updates, permission sets, and API user creation. |
| Data synchronization issues | Configure field mapping correctly and verify synchronization settings between Salesforce and Marketing Cloud. |
| Email tracking not appearing in CRM | Make sure email tracking settings are enabled, and related lists like Email Sends are added to Lead and Contact page layouts. |
Conclusion: Unlocking the Power of Sales and Marketing Integration
Integrating Salesforce Sales Cloud with Marketing Cloud using Marketing Cloud Connect helps organizations bring sales and marketing teams onto the same platform. By connecting CRM data with marketing activities, businesses can gain a unified view of customer interactions and deliver more personalized experiences.
With proper configuration and data synchronization, this integration improves collaboration, enhances campaign performance, and enables organizations to make more data-driven decisions. Ultimately, it empowers businesses to build stronger customer relationships and drive better engagement.
Frequently Asked Questions
-
Marketing Cloud Connect is a native Salesforce integration that connects Salesforce CRM with Salesforce Marketing Cloud, enabling data synchronization and email tracking between the two platforms.
-
Basic Salesforce administration knowledge is helpful. While the integration uses a managed package, proper configuration of users, permissions, and settings is required.
-
The Subscriber Key is a unique identifier used to match records between Marketing Cloud and Salesforce. Typically, the Salesforce Contact ID or Lead ID is used as the Subscriber Key.
-
The setup typically requires Salesforce System Administrator access and Marketing Cloud Administrator permissions to install packages, configure users, and manage integration settings.
Related Reading


Let’s Talk

Drop us a note, we’re happy to take the conversation forward 👇🏻