

From Idea to Launch: How to List an App on Salesforce AppExchange
“How do you list an app on the Salesforce marketplace? Listing a solution involves developing a Second-Generation (2G) Managed Package, passing the Salesforce Security Review, and publishing to the newly expanded AgentExchange directory. To succeed under modern ecosystem guidelines, listings must now support both traditional ISV app frameworks and autonomous Agentforce components.”
The Salesforce AppExchange is a powerful platform and a great way for ISVs to build and share their applications.
However, turning an idea into a practical solution and then listening to AgentExchange involves more than just development; it requires careful planning and preparation at every stage. From shaping your concept to meeting platform requirements and clearing key checkpoints, each step plays a critical role in the journey.
This blog walks you through practical steps to successfully list an app on AppExchange, without unnecessary delays.
1. Start with a Clear App Idea and Value Proposition
Every solid AppExchange app starts the same way: with an idea that actually solves a problem. Before you even think about packaging or listing, you need to be crystal clear on what your app does and why it matters within the Salesforce ecosystem.
Identify the specific pain point you are addressing. Are you eliminating manual data entry? Streamlining a specific workflow? Filling a gap in a niche industry? A well-defined value proposition will guide your development choices and serve as your core Unique Selling Proposition (USP) later on.
You also need to define your target audience early. Are you building for sales teams, service agents, or a specific vertical? Knowing who you are building for helps you create a focused solution that is much easier to market and position.
2. Set Up Your Partner Environment & Foundation
Before you start building, you need the right foundation in place within the Salesforce AppExchange ecosystem. This begins with joining the Salesforce Partner Program and gaining access to the Partner Community.

The Partner Community serves as your central hub for managing everything, from onboarding and learning resources to collaboration and app publishing. Once approved, you’ll receive access to a Partner Business Org (PBO), a dedicated Salesforce org esigned specifically for partners.
Inside your Partner Business Org, you’ll find key tools like:
Environment Hub: to create and manage multiple orgs
License Management App (LMA): to manage customer licenses
Partner Console: to manage listings and operations
Using Environment Hub, you can spin up different types of orgs depending on your needs:
Development orgs- where you build and experiment
Test orgs- for QA, validation, and compatibility checks
Demo orgs- for demonstrating your app in environments that simulate real customer setups
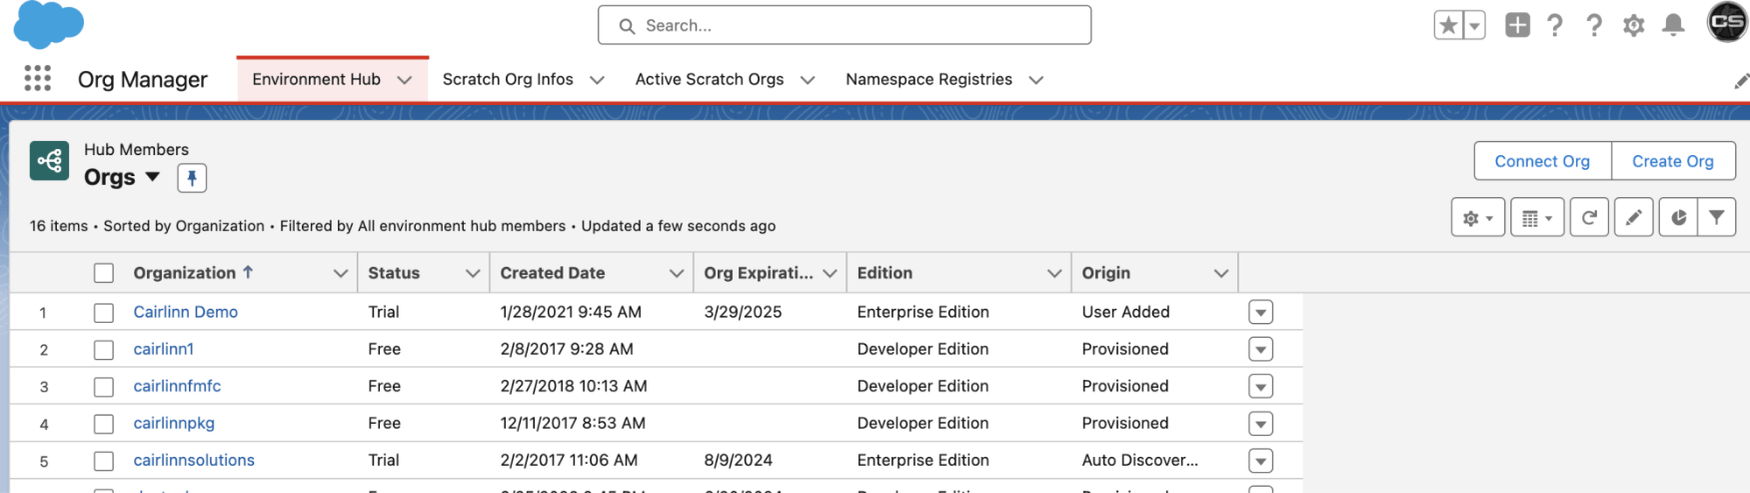
This multi-org approach is a best practice for ISVs. It ensures your app is tested across different scenarios and behaves reliably in real-world customer environments.
If you're new to the Partner Community or need help with setup, you can read the official SalesforcePartner Community setup guide.
3. Build Your App with the Right Architecture
With your environments set up, the next step is where the real work begins, building your app. But on the Salesforce AgentExchange, it’s not just about functionality. Your app must be designed with scalability, performance, and maintainability in mind from day one.
Start by defining your app’s architecture. Most AppExchange solutions are distributed as managed packages, so it’s important to plan how your metadata, dependencies, and versioning will be structured. A well-designed architecture ensures your app can evolve without breaking existing customer implementations.
As you begin development, it’s critical to follow proven Apex security best practices. This includes:
Writing bulk-safe code that can handle multiple records efficiently
Avoiding SOQL and DML operations inside loops to prevent governor limit issues
Avoiding hardcoded values (such as IDs) that can break across environments
Structuring code in a modular and maintainable way
Getting this right early will save significant time and rework when you move into packaging and the AppExchange Security Review phase, while also aligning your app with key ISV compliance requirements.
4. Package and Test Your App
Once your app is built, the next step is to prepare it for distribution on the Salesforce AppExchange through packaging. Most apps are released as managed packages, allowing you to protect your code, manage versions, and deliver updates efficiently.
At this stage, plan your package structure, dependencies, and versioning carefully to avoid issues later. A well-organized package ensures smoother upgrades and a better customer experience.
Testing is equally important. Hence, your app should be validated across different scenarios and org setups.
Focus on:
Writing meaningful unit tests
Testing across multiple environments
Validating end-to-end functionality
Strong packaging and testing reduce deployment risks and help you move confidently into the AppExchange Security Review phase.
For more clarity on packaging options, you can explore our guide on types of Salesforce packages.
5. Create Your AgentExchange Listing
With your app packaged and tested, you can begin creating your listing on the Salesforce AppExchange while preparing for the Security Review. This is where your product is presented to potential customers, so clarity and positioning matter.
Your listing includes both visible and backend elements. On the front end, focus on a clear description, relevant keywords, key features, and visuals like screenshots or demo videos to communicate value effectively.
On the backend, configure pricing, free trials, and lead capture. You can also use Trialforce to offer pre-configured demo environments, allowing prospects to test your app.
A well-optimized listing improves discoverability within AppExchange search, increases visibility, and builds trust. Keep your messaging simple, outcome-focused, and aligned with the problems your app solves.
6. Pass the AppExchange Security Review
Security Review is one of the most critical steps before publishing your app on the Salesforce AppExchange. It ensures your application meets Salesforce’s strict security and compliance standards.
During the review, your app is evaluated for vulnerabilities, data protection, and secure coding practices.
This aligns closely with a Zero-Trust Salesforce approach, where every access is verified, and nothing is trusted by default.
To improve your chances of passing:
Follow secure coding practices from the start
Enforce proper data access controls
Avoid hardcoded credentials or sensitive data
Test thoroughly for edge cases and failures
Read our detailed guide to master the AppExchange Security Review.
To list your app on AppExchange, clearing the Security Review is mandatory; it’s like earning a Salesforce Trust Badge. If you plan to offer your app as a paid solution, a review fee is applicable; refer to the detailed AppExchange security review fees guide for more information.
Tip: Many teams get stuck at this stage, and without clearing it, you can’t move forward. The most effective way to avoid delays is to work with experienced Salesforce PDO partners like Concretio Apps Private Limited, who have proven expertise in building real-world solutions and successfully getting them listed on AppExchange after clearing the security review.
7. Publish and Grow Your App
After successfully clearing the Security Review, your app goes live on the Salesforce AppExchange.
Publishing your app opens the door to customer adoption, feedback, and continuous improvement on the Salesforce AppExchange.
After launch, focus on managing licenses, supporting customers, and releasing regular updates through new package versions. This helps maintain performance and keeps users engaged.
To drive growth, optimize your listing with relevant keywords, keep content updated, and use demos, documentation, and customer feedback to build trust. You can also leverage partner networks and targeted marketing to reach the right audience.
Consistent updates, strong support, and clear positioning are key to turning your app into a successful AppExchange product.
If you’re looking to accelerate development and simplify the listing process, you can consider hiring expert AppExchange developers.
Conclusion
A successful app starts with a strong idea; one that solves real problems and delivers value to users. But turning that idea into a live product on the Salesforce AppExchange requires careful planning, the right development practices, and a clear understanding of the process.
While building a functional app is important, clearing the Security Review plays a critical role in getting your solution published. This is where working with experienced Product Development Outsourcing (PDO) partners like Concretio Apps can make a difference. As an experienced Salesforce AppExchange development company, we bring the expertise needed to build, secure, and launch applications successfully.
With the right approach, guidance, and a bit of patience, you can turn your idea into a successful AppExchange product.
Further Reading
AppExchange Resources
PDO Strategies for Salesforce ISVs: Achieving 5-Star AppExchange CSAT
5 Salesforce AppExchange Solution Types for Business Transformation
About Salesforce Orgs
Frequently Asked Questions
-
A PDO (Product Development Outsourcing) partner, like Concretio, helps ISVs manage app development, testing, packaging, Security Review, and AppExchange listing. They ensure compliance, streamline processes, reduce errors, and accelerate the path to a successful AppExchange launch.
-
No. Test or demo orgs are only for internal testing and demonstrations. Trialforce is the official Salesforce method to provide customers with a secure, pre-configured trial environment for your AppExchange app.
-
Yes. During your listing setup, you can configure paid versions, subscriptions, or free trials using Trialforce. PDO partners can guide you through pricing strategies and ensure that your monetization approach aligns with Salesforce policies and customer expectations.
-
Yes. Managed packages allow you to release new versions of your app, fix bugs, add features, and maintain backward compatibility. This ensures that existing customers continue using your app smoothly while you provide ongoing improvements and updates.
-
Managed packages provide version control, seamless upgrades, bug fixes, and feature additions while maintaining backward compatibility. This allows you to efficiently scale, enhance, and maintain your app post-launch without disrupting existing customer environments or workflows.

Let’s Talk

Drop us a note, we’re happy to take the conversation forward 👇🏻