

Snowfakery vs Smock-It: What’s Best for Salesforce Test Data Generation?
Preparing large-scale test data for Salesforce environments isn’t just tedious; it can take 4 to 6 hours, sometimes even longer.
Imagine your team is stuck generating relational or conditional test data while crucial deadlines slip by. That’s valuable time lost, time that could be spent optimizing application performance, testing new features, or speeding up deployments.
But wait, it's not just about time, you also have to ensure data security and compliance via your generated data. You certainly don’t want to put your customer’s data at risk by hosting it on a third-party server or cloning on higher level sandboxes.
Thankfully, there are online services, tools, utilities, and frameworks through which you can generate realistic look-alike test data (bulk data too) for your testing needs, and that too for FREE. Today, we’re going to compare two such tools - Snowfakery and Smock-It.
While Snowfakery, an open-source tool from Salesforce, has been a go-to for some time, Smock-It is a new CLI plugin designed specifically for generating privacy-compliant, realistic test data for Salesforce environments.
Let’s check how these two tools fare against one another.
Quick Outline
What is Snowfakery?
How does Snowfakery generate test data?
What is Smock-It?
How does Smock-It generate test data?
Feature comparison: Snowfakery vs Smock-It
Making the right choice
What is Snowfakery?
Snowfakery is an open-source test data generation tool (part of the Cumulus CI project), perfect for anyone developing apps and needing synthetic test data to validate app functionalities. Unlike many tools, Snowfakery takes a template-driven approach using YAML files, making it easy to define complex data patterns, hierarchical relationships, and custom rules.
How to Install Snowfakery?
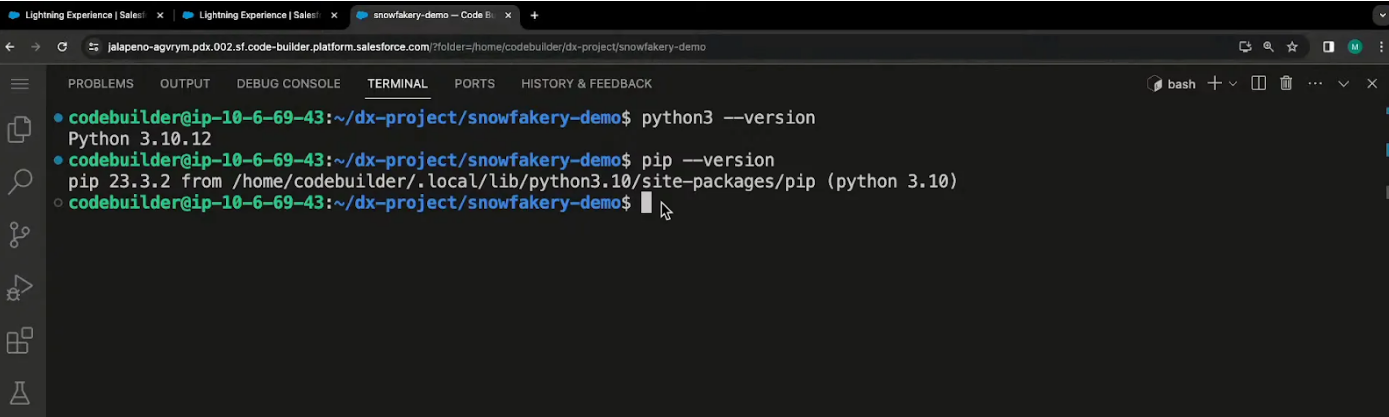
Getting started with Snowfakery is straightforward. First, you need to have Python and PIP (Python's package manager) installed on your machine. Note that while Snowfakery is compatible with various IDEs, for this guide, we'll use Code Builder, which comes preconfigured with the necessary tools.
Prerequisites
Python: Ensure you have Python 3 installed. You can download it from the official Python website.
PIP: This should come with your Python installation, but if not, you can install it separately.
Steps to Generate Synthetic Test Data With Snowfakery
1. Create a YAML Template
The YAML template acts as a blueprint for the data generation process. You specify the object name, the fields you want to populate, and the number of records to create. You can also use random dummy data generators for names, dates, numbers, etc.
Let’s check a quick example to understand test data generation using Snowfakery.
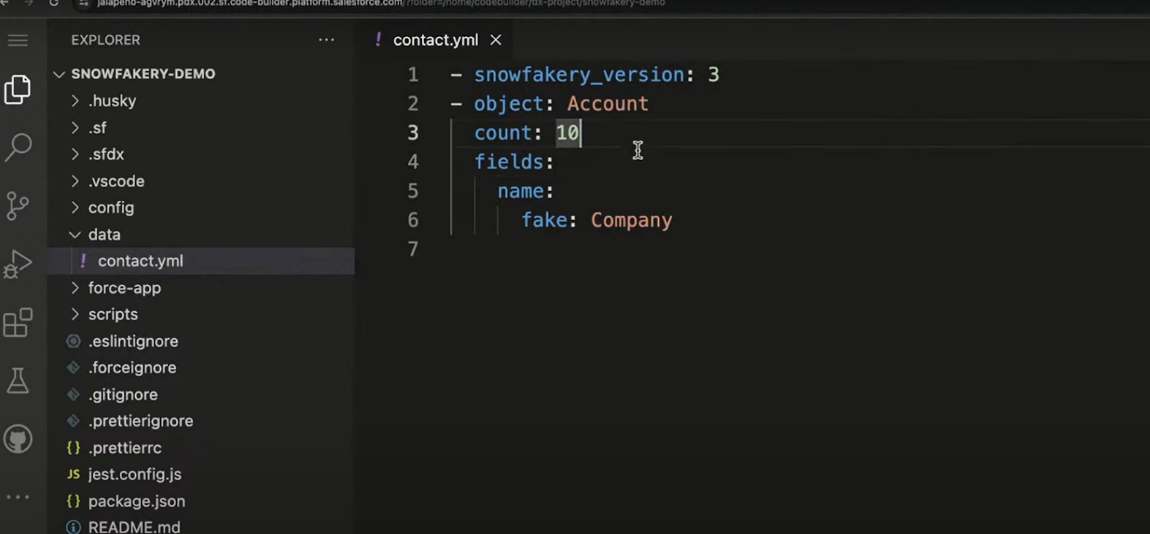
In the above template:
count: 10 specifies that 10 Account records will be generated.
fake: company generates a random company name for each record.
2. Run Snowfakery
Once the template is ready, you execute Snowfakery using the command:
snowfakery data/account.yml

The above command tells Snowfakery to read the account.yml file and generate 10 account records. In the above image, we’ve further extended the command to save the data as a CSV file in the data folder.
3. Data Output
After configuring your YAML file for CSV output, run the same command as before. You’ll find that Snowfakery generates both the CSV file and a metadata file in the specified directory.

Note: Snowfakery generates the data in CSV, JSON, SQL, and TXT formats. This data can be reviewed and loaded into Salesforce using CumulusCI.
Complex Test Data Generation With Snowfakery
1. Hierarchical Data Generation
In Snowfakery, you can define relationships between objects using the friends function. This is particularly useful when you need to link a parent object to its child objects. For example, if you have an account that has multiple contacts, you can set up your YAML file like this:

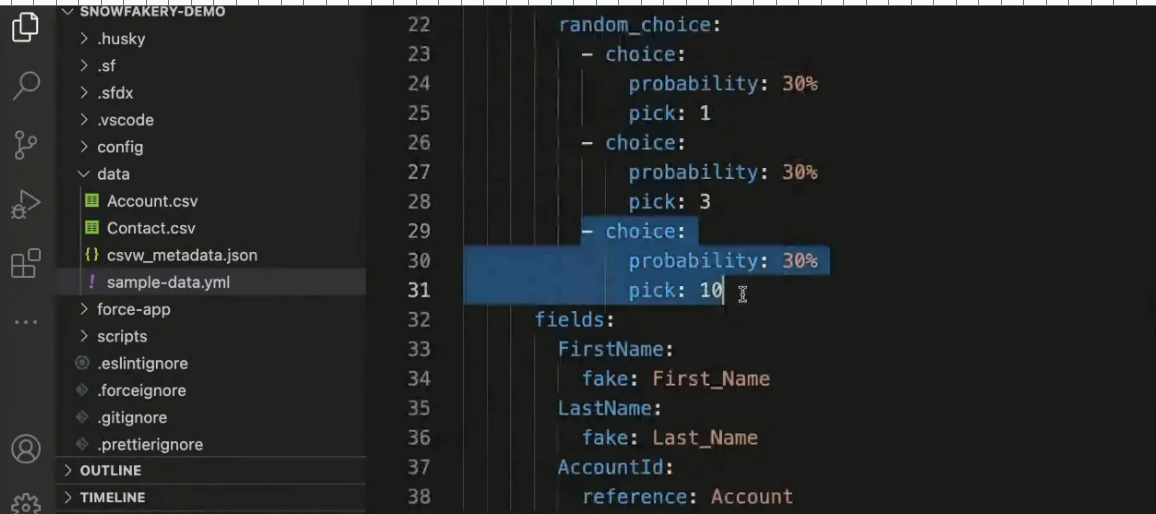
2. Utilizing Random Functions for Data Generation in Snowfakery
Snowfakery’s random_choice function helps generate realistic data by randomly selecting values from a list. You can assign equal chances or set specific probabilities, for example, making “Closed Won” more likely than “New”. It also supports selecting between different object types, like assigning a task to either a contact or a lead. This flexibility makes it easy to simulate real-world variability in your test data with minimal effort.
3. Picklist Handling
As we dive deeper into Snowfakery, let's explore how we can leverage object relationships to create more complex data structures. To illustrate the power of relationships, consider a scenario where each account can have multiple contacts and opportunities.
You can define these relationships in your YAML file as follows:

Here, the YAML script defines fake Opportunity records with structured relationships to Accounts. In above script:
4 records are created for the opportunity object.
The Opportunity name is dynamically generated using the Account name (e.g., "opp ${Account.Name}").
StageName is the picklist field with random choices such as Closed Won, In Progress, and New values.
Amount: Uses the fake data generator to create a random number between 10,000 and 50,000.
AccountId: Uses a reference to Account, ensuring Opportunities are correctly associated with existing Account records.
What is Smock-It?
Smock-It is a command-line Salesforce test data generator tool designed to generate realistic, synthetic test data for Salesforce environments. It empowers developers, QA professionals, and Salesforce admins to test functionalities and workflows without relying on real customer data, ensuring privacy and compliance.
What sets Smock-It apart is its ability to overcome common limitations found in tools like Snowfakery and other Salesforce test data automation solutions. Key capabilities include:
Dependent picklist handling
Automatic field inclusion
Auto Relationship handling
Direct Record Insertion
Conditional test data generation
How to Install Smock-It?
Smock-It can be installed easily via CLI. Follow these simple steps to get started:
1. Prerequisites
Before installing Smock-It, you will require the following to ensure Smock-It installs and executes successfully.
Salesforce CLI
Node.js (v18.0.0 or later)
2. Installing Smock-It with SF CLI
Run the following command in your terminal: sf plugins install Smock-It
3. Verify Installation
To confirm that Smock-It is installed successfully, run: sf plugins
You should see Smock-It listed among the installed plugins.
4. Authenticate with Your Salesforce Org (Recommended)
To use Smock-It for inserting test data, authenticate with your Salesforce org. Use the following command to initiate the authentication process:
sf login org
This command will redirect you to the Salesforce login page, where you can sign in using your credentials. Once authenticated, Smock-It will have the necessary access to interact with your org for data generation and insertion.
How to Generate Test Data with Smock-It?
Mock data generation with Smock-It is fairly easy. It begins with a list of questions. Based on the questions and user response, a template is generated that can be reused or customized for future data generation needs.
1. Template Creation
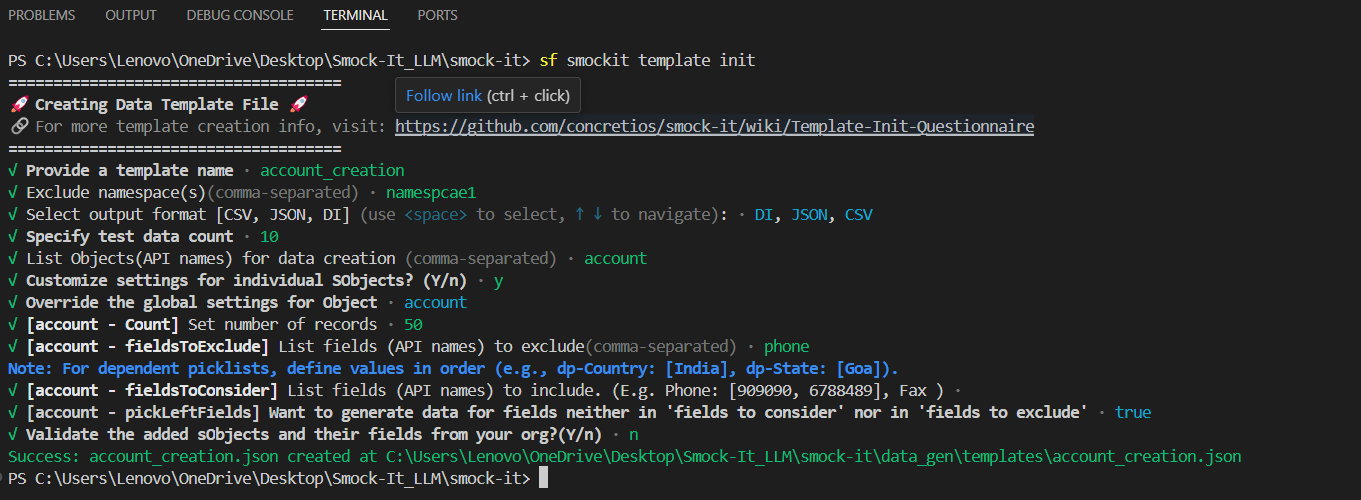
To initiate the template creation process, run the command: sf smockit template init
You will be prompted to provide the following inputs:
Provide a template name ·
Exclude namespace(s) (comma-separated) ·
Select output format [CSV, JSON, DI] (use <space> to select, ↑ ↓ to navigate): ·
Specify test data count ·
List Objects (API names) for data creation (comma-separated) ·
Customize settings for individual SObjects? (Y/n) ·
Validate the added sObjects and their fields from your org? (Y/n) ·
Upon answering the prompts, a template will be generated based on the provided configuration and selected objects
Read through our Init Questionnaire doc for more info
2. Data Generation Command
Once the setup is complete, executing the data generation command is straightforward. For example:
Command format: SF smockit data generate -t template_name -a username or alias
For our use case: SF smockit data generate -t accountDataTemplate.json -a myOrg
This command instructs Smockit to generate data based on the specified template.
3. Validating Template Schema
After running the command, Smockit validates the objects and fields defined in the template against the authenticated Salesforce org. If any issues are detected, they are reported in real-time, allowing for immediate corrections.

4. Viewing Generated Data
Once the data generation process is complete, you can view the records directly within your Salesforce org. The inserted data includes all relevant fields, making it both realistic for testing and aligned with data privacy standards such as GDPR and CCPA.

Complex Data Generation with Smock-It
1. Conditional Data Generation
Smock-It simplifies conditional data generation by allowing you to control exactly which values are included or excluded for specific fields using the fieldsToConsider and fieldsToExclude options.
In the image below, we’ve configured the template to set values for a dependent picklist using fieldsToConsider.

This ensures that every generated record includes “India” as the country and “Rajasthan” as the state, maintaining logical consistency in your dataset.
You can apply the same logic to other fields like email, phone, etc., by defining your preferred values in fieldsToConsider.
Similarly, if there are fields you want to exclude from the generated data—like fax—you can list them under fieldsToExclude, ensuring only relevant data is produced for your testing needs.
2. Handling left Fields
Similar to Snowfakery, Smock-It also offers auto-record generation for Unspecified Fields.
Setting pickLeftFields = true ensures that all fields not specified in fieldsToConsider or fieldsToExclude are automatically filled with random data, saving you from having to define each field manually.
If you don’t want to generate unspecified fields, simply set pickLeftFields = false.
3. Relationship Handling
While most mock data generation tools, including Snowfakery, use a multi-step approach to map relationships, Smock-It does it in a single step without mentioning the parent fieldname/reference ID as we require in Snowfakery.
Check out the image below, where Smock-It has created record IDs for all objects.

4. Direct Insertion and Multi-Org Data Upload
Direct Insertion: One of Smock-It's standout features is its ability to directly insert generated records into your authenticated Salesforce org, with no need for external tools or manual data migration. Once the data is generated, it’s immediately pushed into the authenticated org (only if DI is selected as the output format).
Data Upload: Smock-It supports uploading the same dataset across multiple Salesforce orgs. This is particularly useful for QA teams that need consistent test data in different environments. Just authenticate each org, and Smock-It takes care of the rest. For this to work, ensure that a JSON or CSV file is present in your data_gen output folder. Then, simply run the following command with the data file name and org alias or username:
sf smockit data upload -u <fileName> -s <sObject> -a <orgAliasOrUserName>
Comparison: Snowfakery vs Smock-It
| Smock-It | Snowfakery | |
|---|---|---|
| Auto Relationship Handling | ✅ | ❌ |
| Conditional data handling | ✅ | ✅ |
| Dependent picklist handling | Selects real-time value | Req. multiple steps (via if, when) |
| Output formats | DI, JSON, CSV | JSON, CSV, TXT |
| Pricing | FREE | FREE |
| Auto inclusion of required fields | ✅ | ❌ |
| Direct Record Insert | ✅ Built-in insertion | ❌ Requires CumulusCI or extra setup |
| Template validation | ✅ | ❌ |
| Record Limit | 3,00,000/day | 10,000,000/day |
| Upload Data to Multiple Orgs | ✅ | ❌ |
Making the Right Choice!
Both Snowfakery and Smock-It are powerful tools for generating Synthetic Salesforce test data, but they cater to different needs.
Snowfakery is ideal for generating large volumes of test data (up to 10 million records per day) and offers YAML-driven templates for customization. However, it requires manual setup for relationships, dependent picklists, and required fields, making it better suited for advanced users comfortable with scripting.
Smock-It, on the other hand, provides a simpler and more automated CLI-based approach, allowing direct record insertion with automatic relationship handling, required field inclusion, and real-time dependent picklist selection. It also supports uploading the same dataset across multiple authenticated Salesforce orgs, making it useful for QA teams working in parallel environments. While its record limit is lower (3,00,000/day), Smock-It simplifies data generation for Salesforce admins and developers who need quick, consistent, and efficient test data creation without extensive scripting.
In short, choose Snowfakery for high-volume, complex data needs and YAML-based customization, and Smock-It for ease of use, automation, and seamless data insertion across orgs.
Let’s Talk!

Drop a note to move forward with the conversation!