

How to Create a Test Data Template in Smock-It
Generating realistic test data can be challenging, especially in Salesforce, where maintaining relationships between objects adds an extra layer of complexity. Fortunately, a powerful test data generation tool like Smock-it can simplify this process, allowing you to generate realistic, relational, and unique datasets in seconds.
To make this work, all you need is a data generation template, where you can define exactly what data you need, how it should look, and how different objects should relate to each other. In this blog, we’ll walk you through how to create a data generation template to get you started
Note: The steps we’re about to cover begin after you’ve installed Smock-it. If you haven’t set it up yet, please refer to our How to Install Smock-it blog before proceeding.
Build a Template for Test Data
The first step in generating your test dataset is initializing a data generation template.
Smock-it makes this easy with a guided CLI setup. With just one command, it launches a questionnaire that walks you through everything needed to configure your test data. Your inputs are then saved in a reusable .json template file.
To get started, open your terminal and run: sf smockit template init
Once executed, Smock-it will prompt you with a series of questions to tailor the template to your specific testing needs. Simply answer each prompt, and your template will be generated.

Smock-it template questionnaire
Step 1: Name the Template
You’ll first be prompted to provide a template name. Choose a short, descriptive name that reflects the use case. For example, if your goal is to generate test data for Accounts, you could name it CreateAccount.
This name will be used to save your template file (e.g., CreateAccount.json), making it easy to find and reuse later.
Step 2: Exclude Namespaces
If your org includes managed packages, it’s best to exclude unnecessary namespaces. This ensures your generated test data focuses only on fields relevant to your business logic, avoiding unrelated managed package fields.
To exclude multiple namespaces, separate them with commas: testDataGen, customNS
Step 3: Select Output Format
Smock-it allows you to choose one or more output formats for your test data:
CSV — Download your records in a spreadsheet-friendly format.
json — Get a clean JSON structure ideal for importing or code-based use.
DI— Directly insert records into your Salesforce org.
Use the spacebar to select multiple options. For most cases, we recommend selecting all three for maximum flexibility.
Step 4: Specify Test Data Count
Next, define how many test records Smock-it should generate globally. For example, by entering 200, it will generate 200 records across your specified objects, unless you choose to override this count at the object level (more on that shortly).
Step 5: List Objects for Data Creation
Now, list the Salesforce object(s) you want test data for. You can enter API names like: Account
Or multiple objects, separated by commas: Account, Contact, Opportunity
Note: If you leave this blank, Smock-it will default to generating data for the Lead object.
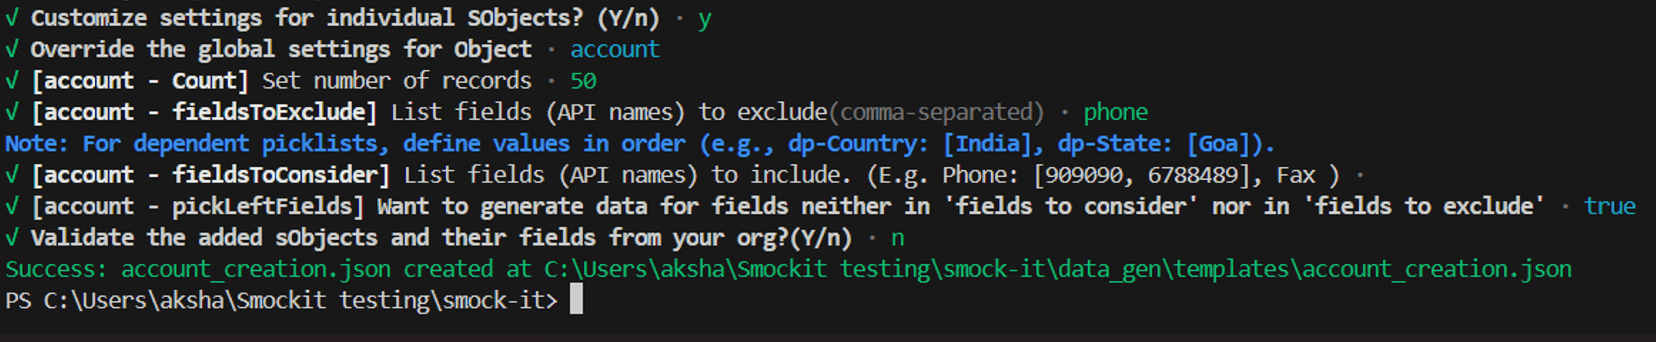
Step 6: Customize Settings for Individual Objects?
To get more control over data generation for each object, type Y. This allows you to override global settings like record count, fields to include or exclude, and the pickLeftFields option for specific sObjects. (Note: This will add a few extra steps.)
Customizing individual objects
To apply the same configuration across all objects and skip individual customization, type n. Smock-it will then proceed directly to Step 7: Validation.
Step 6.1: Override Global Settings for an Object
Upon selecting Y in Step 6, Smock-it will prompt you to choose the object you want to customize. You can repeat this step for multiple objects, just provide the object API name (e.g., account, contact).
Step 6.2: [ObjectName - Count] Set Number of Records
Specify how many records you want Smock-it to generate for the selected object. This overrides the global test data count defined earlier, giving you object-specific control.
Step 6.3: [ObjectName - fieldsToExclude] List Fields to Exclude (comma separated)
Enter the names of the fields you want to exclude. Smock-it will skip generating data for these fields on the selected object.
Step 6.4: [ObjectName - fieldsToConsider] List Fields to Include (comma separated)
Enter the names of the fields you want to explicitly include. Smock-it will generate data only for these fields unless pickLeftFields is enabled.
Pro Tip 💡: You can define dependent picklists in fieldsToConsider by specifying valid parent-child values to maintain relationships between fields.
Step 6.5: [ObjectName - pickLeftFields] Generate data for unspecified fields? (true/false)
If set to true, Smock-it will generate data for all fields except those listed in fieldsToExclude.
If set to false, only the fields listed in fieldsToConsider will have data generated; all others remain empty
Note: You can always update object-level settings later using CLI commands to modify field inclusions, record count, and other parameters, even after the template is saved (we’ll cover this soon).
Step 7: Validate SObjects and Fields? (y/n)
Smock-it lets you validate object metadata and field names directly from your Salesforce org. To skip it during template creation, choose n. Since validation is required, Smock-it will still perform it automatically during data generation.

Template validation during data generation
Note: To validate, you must authenticate your org first. You can save the template without authentication and connect your org later, but make sure it's done before generating data; otherwise, the data generation will fail.
Refer to the GitHub documentation for steps on org authentication.
Customizing the Template Using Commands
Once a template is saved, you can customize it further in two ways:
Directly editing the JSON file
Using CLI commands
For beginners, we recommend using the command approach for better structure and fewer errors.
To add or update template settings, use:
sf smockit template upsertTo remove specific configurations, use:
sf smockit template remove
Note: sf smockit template upsert and sf smockit template remove are the primary commands for modifying your template. To use them effectively, you’ll need to specify the areas you want to customize.
For detailed instructions, refer to the GitHub documentation for upsert and remove commands.
Smock-It Template Command Flags
| Flag | Shorthand | Description |
|---|---|---|
| --templateName | -t | Name of the template JSON file |
| --sObject | -s | Salesforce object to update/add |
| --count | -c | Number of records for the object |
| --namespaceToExclude | -x | Namespaces to exclude |
| --outputFormat | -f | Output format (e.g., json, csv) |
| --fieldsToExclude | -e | Fields to exclude |
| --fieldsToConsider | -i | Fields to include |
| --pickLeftFields | -p | Whether to generate data for unspecified fields |
Wrapping Up
Creating realistic and relational test data doesn’t have to be complex or time-consuming. With Smock-it, you can easily define, generate, and manage test datasets that align with your specific Salesforce needs. Whether you're working with a single object or managing complex multi-object relationships, Smock-it gives you the control and flexibility to build reliable test data with confidence.
Resources:
Github Document- Template Init Questionnaire
Let’s Talk!

Drop us a note, we’re happy to take the conversation forward